Typography is integral to any design, and if you’re using Adobe Photoshop for your creations, it all starts with the text tool. Adding, modifying, and editing your text could not be simpler, and can open up a world of great design for the budding graphic designer.
How to Add Text in Adobe Photoshop
- Click the Text tool button in the menu or use the keyboard shortcut T. Once you do that, you should see a cursor.

- Click on the canvas where you want your text to appear and start typing.
How to Add Paragraphs in Adobe Photoshop
- Click the Text tool button in the menu or use the keyboard shortcut T. Once you do that, you should see a cursor.
- Click and drag on your canvas where you want your text to appear and draw a bounding box to limit the dimensions of your text.
- You can then start typing in your text box.
- You can alter the dimensions of the text box by clicking and dragging any of the anchor points. Just hover over them and your cursor should turn into arrows.
How to Edit Text in Adobe Photoshop
Once you’ve inserted the text, you’re going to want to select a font and size that suits your design.
With the text tool still selected, you can choose all the key features including typeface, weight, and size with the menu at the top of the screen. Use the dropdown menus to make your selections. You can also choose the text justification and color.
Another way to access these settings if you’re running Adobe Photoshop CC 2018 is through the properties panel:
- Go to Window > Properties to open the panel.
- Select the layer of text you want to edit.
- With the layer selected, you should see all the same text settings listed above in the properties panel.

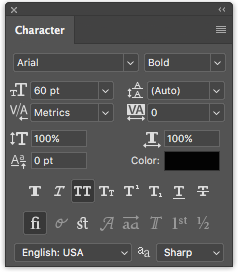
For even more features and settings you’ll want to open the Character panel by going to Window > Character.
Here, you can access the same settings above, as well as a few others. You can change your leading (space between lines of text) and kerning (space between characters), switch your text to all caps or small caps with the click of a button, and more.
How to Modify and Move Text in Adobe Photoshop
There are two ways you can access and change existing text. For a simple approach, do the following:
- Select the Text tool from the Tools panel or by using the keyboard shortcut T.
- Click anywhere directly on the text you want to edit on your canvas.
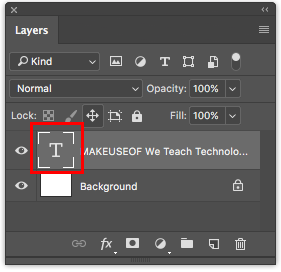
The second method requires you to have your layers panel open, but you don’t need to have the Text tool selected:
- Open up your layers panel by going to Window > Layers.
- In the list of layers in your Layers panel, find the text you want to edit and double-click the large T button. This will highlight all of the text in that layer.
- You can then click your cursor in that text to select, delete, or add more text.
To move your text, do the following:
- Select the Move tool from the Tools panel or use the keyboard shortcut V.
- Click directly on the text on your canvas and drag to move without releasing the mouse.
No comments:
Post a Comment