Wednesday 31 May 2017

How to Block Calls on Samsung Galaxy S8?

Blocking calls on the Samsung Galaxy S8 is not at a big deal. We all have got some numbers or contacts on our list that we don’t want to listen to calls from. Or also, there are some unwanted or spam numbers that are really annoying and we want to ignore them.

If you are one of us and got your brand new Samsung Galaxy S8 recently, you probably are looking for a way to block the calls on your phone. If so, you are at the right place.

Although there are a number of apps that can perform the same function, Samsung Galaxy offers the built-in call blocking feature for all its users. Check out the guide on how to block calls on Samsung Galaxy S8 and thank me later.

Blocking Calls on Samsung Galaxy S8:

Along with its number of amazing features, Samsung Galaxy S8 offers the much-needed call blocking feature that you can also use to save your time and your nerves. Here’s how you can do it too:

Also Read: Top 4 Best Features that Samsung Galaxy S8 Own

#1: Grab your Galaxy S8 and head towards the “Phone App” from your home screen.

#2: There, you would see a “three dotted option” on the upper right corner of the screen.

#3: From there, you will see a number of options under “Block Numbers” heading including:

  • Enter Number manually

  • Choose number from your contact list

  • Choose a match criteria option.


Choose your desired option and select your desired number that you want to block.

How to Block Calls on Samsung Galaxy S8?

You can unblock the blocked number by repeating the above three steps. From the Block Numbers option, tap the minus sign next to the contact name or number to remove it from your already blocked numbers.

Also Read: Setting Up Fingerprint Sensor on Samsung Galaxy S8/S8 Plus

So turn down all the unwanted numbers and save your nerves. For more tips and tricks for Samsung Galaxy S8 or any other Android phone, keep visiting us.

To comment on this article and other TechViral contents, visit our Facebook page, Pinterest page, Instagram Account or our Twitter feed.

How to create snapchat account and face swap filter

Snapchat is a fun app that lets you send brief "Snap" photos and videos to your friends. These Snaps can be viewed for a few seconds before they are deleted forever.

How to set up your Snapchat account

  1. Download the free Snapchat app. Go to the App Store (for iOS Apple) or the Google Play Store (for Android) and download.

2. Create an account. Open the Snapchat app and tap “Sign up.” ...

3. Create a username. ...

4. Verify that you"re a human. ...

5. Scan your contacts. ...

6. Take a Snapcode selfie.

How to face swap with Snapchat


Snapchat


Swap faces with your friends, parents, cat, funny  features in Snapchat!

While it seems like using Snapchat’s face swap lens could be a pain it the butt to master and it"s surprisingly easy to get swap faces. So grab your phone and a friend"s face and get ready to swap away!

How to use face swap with Snapchat
  1. Launch Snapchat from your Home screen.

  2. Make sure the front facing camera is on.

  3. Find a potential face swap.

snapchat launchsnapchat filter4. Tap on your face and hold for a second — a white grid should appear on your face and the lens options will pop up at the bottom of your screen.

5. Swipe left you find the face swap option.

6. Adjust your faces into position.

Now you"re ready to start face swapping with anyone and everyone you see! Try face swapping with posters, your pets, album covers, magazines, dolls, old photographs, comic books, TV, posters, and more.

To comment on this article and other TechViral contents, visit our Facebook page, Pinterest page, Instagram Account or our Twitter feed.

Sunday 21 May 2017

How to share iCloud Photo Sharing albums with others

Apple"s Shared Photo Streams are part of iCloud Photo Library: They let you post your photos for friends to view, similar to the way you would on other social networking sites like Instagram, but in a more private capacity.


It"s a great feature if you"re sharing images from a trip, you"re away from home at college, or you simply have important work images you want to quickly send to co-workers.


You can share a photo stream with a single person or with a group of people, subscribers can add photos, like and comment on pictures, upload their own images, and so much more!

You can even share a Photo Stream with someone that doesn"t own any Apple gadgets by sharing through a designated web link (pretty nifty, huh?)

All-in-all, iCloud Photo sharing is an unbelievably handy service – if you know how to use it properly! Here"s how you can share and interact with others while sharing your photos with iCloud.

How do I share iCloud Photo albums with other people? It"s simple: here"s how!


How to add people to a shared photo album on iPhone and iPad


  • Launch the Photos app from your Home screen.

  • Tap Shared at the bottom of your screen.

  • Tap the plus sign in the upper left corner to start a new album.

How to add people to a shared photo album
  • Title your album and tap next.

  • Type someone"s name to invite them from your contact list or their email to add them to an album.

  • Tap Create to create the album.

How to create the album

How to remove a subscriber from a shared photo album on iPhone and iPad


  • Launch the Photos app from your Home screen.

  • Tap Shared.

  • Tap the album you would like to remove a subscriber from.

How to remove a subscriber from a shared photo album
  • Tap People.

  • Tap the name of the subscriber you would like to remove from the album.

  • Tap Remove Subscriber.

Remove Subscriber

How to let other add photos to your shared Photo Streams on iPhone or iPad


Thanks to iCloud, you can share Photo Streams with others. It"s not just a one-way experience, either. If you want to share vacation photos with the group you recently took a trip with, everyone can upload to one photo stream together.
  • Launch the Photos app on your iPhone or iPad.

  • Tap Shared at the bottom of the screen.

  • Tap the album for which you want to allow subscribers to add photos.You might have to navigate out of your shared Activity stream first by tapping Sharing in the upper left corner to go back to your list of shared photo albums.

How to let other add photos to your shared Photo Streams
  • Tap People at the bottom right of the screen.

  • Toggle the switch Subscribers can Post on to allow others to add their photos to your shared Photo Stream.

Subscribers can Post

Now everyone that subscribes to your Shared Photo Stream will be able to upload their photos to the same album.


How to like or comment on photos in a shared Photo Stream on iPhone or iPad


Just like posting on social networking sites like Instagram or Facebook, you can like and comment on photos in a shared Photo Stream, the main difference being that only the people you have invited to share photos with will see what you liked and commented on. It"s much more private.
  • Launch the Photos app on your iPhone or iPad.

  • Tap Shared at the bottom of the screen.

  • Tap the album for which you want to like or comment on a photo.You might have to navigate out of your shared Activity stream first by tapping Sharing in the upper left corner to go back to your list of shared photo albums.

How to like or comment on photos
  • Select a photo.

  • Tap Like in the bottom right corner to like the photo.

  • Tap Add a comment in the bottom middle to add a comment.

 Add a comment


How to share a Photo Stream with people that don"t own an Apple gadget


Apple actually makes it possible for non-Apple users to see photos you"ve uploaded to iCloud by viewing them on a public website. All a person needs is the URL. Viewers using iCloud via a web browser will not be able to like or comment on photos, but they can download a copy onto their devices.
  • Launch the Photos app on your iPhone or iPad.

  • Tap Shared at the bottom of the screen.

  • Tap the album for which you want to allow anyone to view photos from a web browser via iCloud.com.You might have to navigate out of your shared Activity stream first by tapping Sharing in the upper left corner to go back to your list of shared photo albums.

How to share a Photo Stream with people
  • Tap People at the bottom right of the screen.

  • Toggle the Public Website switch on to allow anyone with the URL access to the shared album from a web browser.

Toggle the Public Website

These photos don"t have any sort of privacy wall. Anyone with the link can access the photos. Keep that in mind when deciding to share your Photo Streams via a URL link from iCloud. To grab a copy of the link, tap Share Link.


How to unsubscribe from a shared Photo Stream on iPhone or iPad


Things change. People change. Sometimes, you don"t want to see pictures of you and your ex doing awesome things together. Sometimes you just want to unsubscribe to a shared Photo Stream. If you want to remove memories from your iPhone or iPad (and your life), you can unsubscribe from a shared Photo Stream.
  • Launch the Photos app on your iPhone or iPad.

  • Tap Shared at the bottom of the screen.

  • Tap the album for which you want to unsubscribe.You might have to navigate out of your shared Activity stream first by tapping Sharing in the upper left corner to go back to your list of shared photo albums.

How to unsubscribe from a shared Photo Stream
  • Tap People at the bottom right of the screen.

  • Tap Unsubscribe at the bottom of the page.

  • Tap Unsubscribe to confirm that you want to unsubscribe from the shared Photo Stream.

Unsubscribe

This will remove the Photo Stream from your device, including any you uploaded. If you added photos to a shared photo stream that you want to keep, be sure to download them onto your device before you unsubscribe.

To comment on this article and other TechViral contents, visit our Facebook page, Pinterest page, Instagram Account or our Twitter feed.

Sunday 14 May 2017

Top 4 Best Features That Samsung Galaxy S8 Own

After a long wait, Samsung Galaxy S8 is finally launched in the market. Before its launch, there were a number of rumors and leaks about the phone that turned to be true. As a matter of fact, Samsung Galaxy S8 has also got rave reviews from the customers because of its amazing features that it owns.

Wondering which features? If so, read on to know about the best features of the Samsung Galaxy S8.

The Positives of Samsung Galaxy S8:

So, grab your popcorn, sit back, relax and check out the best features of Samsung Galaxy S8:

#1: Always On Display:

Top 4 Best Features Samsung Galaxy S8 Own

Display of the Samsung galaxy S8 is one of the best features according to the users. People have actually loved the phone because of its display. The reason for so much popularity of the display is because it offers the Super AMOLED screen with higher resolution and better colors. The screen of the Samsung is completely re-designed to allow the users with the next level display experience.

#2: Bixby Voice Assistant:

Top 4 Best Features Samsung Galaxy S8 Own

Bixby is another important feature to mention here. Just like the Apple’s Siri, Samsung Galaxy S8 offers its own virtual assistant that can perform more function than Siri. Through this feature, the owners will get to give commands to the phone via talking. This feature doesn’t go by default in the UK, but it is expected to launch in the US soon.

#3: Plenty of Customization Options:

Top 4 Best Features Samsung Galaxy S8 Own

Another worth mentioning feature of the Samsung Galaxy S8 is that it offers plenty of customization options. These options include personalization of the Always On Display, battery usage optimization, Bixby button remapping and much more. It is always overwhelming.

#4: Battery Life:

Top 4 Best Features Samsung Galaxy S8 Own

Although the battery life of the Samsung Galaxy S8 is not that amazing, but still, it lasts much longer than the previous Samsung phones on a single charge. Not only this, the wireless charging of the phone is also worth mentioning here.

With all these features, Samsung Galaxy S8 is probably the best phone till this part of the phone. To learn more about Samsung Galaxy S8, keep visiting our website.

To comment on this article and other TechViral contents, visit our Facebook page, Pinterest page, Instagram Account or our Twitter feed.

Friday 12 May 2017

What Colors iPhone 8 would be Offered In?

After the arrival of the Samsung Galaxy S8, people have put their sight and expectations over the iPhone 8 – the upcoming flagship from Apple. With this upcoming featured phone on the wait list of tech enthusiasts, loads of news and leaks are buzzing around regarding the features, looks and its design.

You might have gone through the number of leaks regarding the features of the phone, but you might not have read anything regarding the range of colors, iPhone 8 would come in. In the previous month, Apple has launched the Red color in the iPhone 7 and that is the reason most of the Apple enthusiasts have been wondering if there is any new addition to the range of colors in the iPhone 8. If you are among the ones thinking the same, you would love to read the article further.

Also Read: Best Apps for iPhone

Expected Colors that iPhone 8 Would be Offered In:

iPhone 8 is going to be launched soon and before getting into the colors expected, have a look at the colors that previous iPhones showed up:

  • Gold Edition of iPhone 5s – 2013

What Colors iPhone 8 would be Offered In
  • Rose Gold Edition of iPhone 6s – 2015

  • Black and Jet Black Edition of iPhone 7 – 2016

What Colors iPhone 8 would be Offered In
  • Red Edition of iPhone 7/ 7Plus – 2017

What Colors iPhone 8 would be Offered In

Previously, Apple has offered a wide range of colors in the previous versions of iPhone including Glossy Jet Black, Rose Gold option in iPhone 7. Recently, the RED color edition in the iPhone 7 is perhaps the best addition to color in the iPhone’s family.

Also Read: Tricks to Free Up Space on your iPhone

With all this in mind, you can expect anything from the Apple making iPhone 8. Maybe the company would stick with the previous color range like Gold, Rose Gold, Jet Black, Red etc. or also, it can introduce a completely new color to enhance the looks to ditch monotony.

This is all we know till now. You have to wait for the phone to be out in the public and keep pace with our website to keep pace with all what’s going in the tech world.


To comment on this article and other TechViral contents, visit our Facebook page, Pinterest page, Instagram Account or our Twitter feed.

Setting Up Fingerprint Sensor on Samsung Galaxy S8/S8 Plus

The biometric features of the Samsung Galaxy S8 / S8 Plus are almost revolutionary. These features include the iris scanning, facial recognition, and fingerprint scanning. Among these biometric security features of the phone, the fingerprint scanner is found to be the most secure feature of all.

Although there are a number of complaints about its placement and positioning, still, the fingerprint scanner is most used in the Samsung galaxy’s new flagship. So, if you are looking to set it up, here you go. We have got you covered with the guide that will describe how to set up the fingerprint sensor in Galaxy S8/S8 Plus.


How to Set Up Fingerprint Reader on Samsung Galaxy S8/S8 Plus?

Setting up fingerprint sensor on the Samsung Galaxy S8/S8 Plus is easy really easy. All you need is to have your phone in your hand and to follow the following steps:

  • Reveal the “Notification Shade” by swiping down from the top of the screen.

  • From there, head to the “Settings “area.

  • From settings, tap “Lock screen and security”.

  • There you will find an option designated as “Fingerprint scanner”

  • Tap the option and you will be asked to scan your fingerprint.

  • After doing that, you are done.


Setting Up Fingerprint Sensor Gestures:

You can also set up the fingerprint gestures from the fingerprint scanner option hidden deep inside the settings. This option comes turned off by default, but you can set it up On by following the steps:
  1. Head to the Settings and select Advanced features.

  2. Toggle fingerprint sensor gestures “On”.

  3. And you are done!


To comment on this article and other TechViral contents, visit our Facebook page, Pinterest page, Instagram Account or our Twitter feed.


Thursday 11 May 2017

Google will soon require Android for Work profiles for enterprise users

Google recently announced that enterprise mobility customers will be required to use Android For Work profiles. Here"s what this means for companies using Google Mobile Management.


Google knows the importance of keeping your information safe; and they work diligently to ensure the Android experience, for both consumers and businesses, is one centered on device and data security. This is especially true for enterprise users, where the possibility of personal and business data overlap can occur. If your staff works with Android and you"re a customer of Google Mobile Management, you will soon notice a fairly important change coming with version 7.55 of the Google Apps Device Policy.

Also Read: How to Use Android Effectively

The change is simple, yet crucial, and one that helps Google to promote the use of Work Profiles. Why? Simple. The sandboxing of business data should be a top priority for businesses, which is why Google has shifted the Google Apps Device Policy such that it will now, by default, utilize an Android for Work, IT-managed work profile for those customers that meet specific requirements. Said requirements are:
  • Your company uses Google Mobile Management (GMM) for Android

  • Android at work is enabled for the entire organization (or an organizational unit)

  • The organization using GMM and is whitelisting apps in managed Play

  • Devices must support work profiles

  • The Google Apps Device Policy app being used for enrollment is version >= 7.55

The change


Should your company/devices meet the above requirements, when you enroll new devices, users will now find a default work profile available. With this work profile, users will be able to access the managed Google Play store and install apps that have been curated and whitelisted by the GMM administrator. This enabled policy will also provide well-defined separation between personal and corporate data in such a way that the GMM administrator cannot accidentally remove a user"s personal data. This works in conjunction with the other features an administrator can manage through GMM:

Also Read: How Apps can Boost your Business
  • Device password strength

  • Device password length

  • Number of invalid passwords allowed before the device is wiped

  • Number of recently expired passwords that are blocked

  • Number of days before a device password expires

  • Number of idle minutes before a device automatically locks

  • Application auditing

  • Remote account removal from a device

  • Remote wipe a device

  • Device policy app version requirements

  • Number of days device is not synced before wiping

  • Blocking of security-compromised devices

  • Configure Wi-Fi networks

  • Manage network access certificates

Long overdue


This is a change that is long overdue. When a company makes use of Mobile Device Management for staff/employees, the idea is to ensure the integrity and security of sensitive data. Without a work profile in place, company data is not sandboxed from personal data and that is a disaster waiting to be unleashed.

With an Android For Work profile in place, it becomes significantly more challenging for anyone to steal company data. If you"re unsure of the importance of work profiles, consider these features:
  • Supported devices will isolate corporate data and personal data, so users only need work with one piece of hardware

  • Administrators can curate and whitelist applications that are needed/required for corporate use

  • IT administrators cannot erase personal emails, photos, or other personal data (but can easily wipe the content within the work profile)

Can users opt-out?


In a word, yes. If your corporate policy allows for opting out of using a work profile. Should you do this? Clearly the choice is up to your company, but there is a reason Google is opting to bring about this change. In the current mobile landscape, security of corporate data has become an unavoidable issue. With more and more vulnerabilities found on the major mobile platforms, and users frequently working with a single device, for both personal and company data, providers and manufacturers have to do everything they can to protect the interests of both companies and individuals. This change in the Google Apps Device Policy should go a long way to aid in that protection.

So long as users don"t opt out.

When does the change take effect?


Starting June 5, 2017, the release of the Google Apps Device v7.55 will include this change. The release will be available to all G Suite editions.

Monday 1 May 2017

How to Use Android Effectively [2017]

This How-To course aims to teach you how to use Android effectively, showing you the most important settings and methods needed to really become an Android pro and get the most out of your device.

Android is the most popular mobile operating system in the world. While Apple’s iOS (iPhone and iPad) receives lavish attention and has a devout following, Android continues to rack up impressive numbers. In fact, it holds roughly 88 percent of the global market share.

Part of the reason for this is that Android faces little competition. iOS continues to be its only viable foe, particularly in the United States with where it claims a 43 percent market share. Windows Phone and the ever-fading Blackberry can’t come close to stacking up.

All this really means is that a whole lot of people use Android and, time after time, we see people struggling to master it. It’s not that Android is hard to use, in fact, it’s very easy, but earlier versions are often slow and clunky while newer ones have a lot of features you need to learn to make the most of it. Also, people may simply not know or realize many of the ways you can better manage your device rather than it managing you.

That’s what we’re here to help with.

Understanding Android Versions


Android has seen many versions since version 1.0 was released in 2008. Since 2009 they have been named after desserts or sweets alongside their corresponding version numbers. For example, the first public version of Android was named “Cupcake.” Since then we’ve seen Donut, Eclair, Froyo, Gingerbread, Honeycomb, Ice Cream Sandwich, Jelly Bean, KitKat, Lollipop, Marshmallow, and Nougat.

Also Read: How to Hide Photos on Android

Unlike the iPhone, however, not all recent phones will necessarily get the latest and greatest version. Depending on your phone, its manufacturer, and the carrier you’re on, you could buy a phone that gets stuck on one version while everyone else moves on. That means there are a lot of different versions of Android out there still floating out in the wild.

Given how many versions are out there, it’s difficult to write instructions for everyone, but we believe in always having the latest version of any operating system installed. Not simply to take advantage of the latest features, but also because the most recent versions represent a long effort by Google to hone its operating system so that it works on much older hardware than previous Android versions.

If you cannot upgrade to the most recent versions of Android, then it probably means you’re stuck with the version you have until you can buy a new phone or tablet. Don’t worry, most of the information we cover here can still be applied in some way and, if it cannot, you still have this series as a resource when you do finally upgrade!

What’s the Difference Between “Pure” Android and Other Distributions?


Handset makers go through a vast array of tricks to make Android more user friendly. But what you often end up with is a convoluted mess of eye candy and unneeded apps that add more bloat than they’re worth. Unless you buy a Google Nexus or Pixel phone, your phone will probably have a custom “skin” for Android made by its manufacturer, like Samsung’s “TouchWiz” interface and LG’s “LG UX”. While they each have their own dedicated fans, this problem splinters the Android community even more, and gives everybody a different interface to learn.

But some phones–particularly Google’s Nexus and Pixel line–contain Google’s original version of Android, without the extra tweaks. This has attracted its own hardcore following of users who swear by stock, or “pure” Android.

Also Read: How to Hide Files on Android

The result of this is an Android distribution as Google intended. For the purposes of this series, we will refer to stock Android and, where necessary, Samsung Touchwiz or LG UX. We include Samsung simply because it is used by 29 percent of US Android users, and worldwide, the company accounted for 23 percent of all smartphone shipments in 2013.

Getting a Lay of the Land


Android is super easy to use. It employs a few consistent UI features and elements that can be found across nearly all Android devices. We’ll go on a little tour of these before diving a bit further into many of the settings you will encounter throughout this series.

The Home Screen


Unlock your device and you’re greeted by the home screen. Think of this as a desktop of sorts, but unlike a traditional PC, you can have as many home screens as you want, which you simply swipe left or right to access. You can place a whole variety of app shortcuts, app groups, and widgets on your home screen(s).

Below is a screenshot of stock Android’s home screen on the left, and Samsung Touchwiz on the right.


Android Home ScreenThe Home Screen


Note that your home screen will vary according to how your handset manufacturer lays it out or however you customize it.
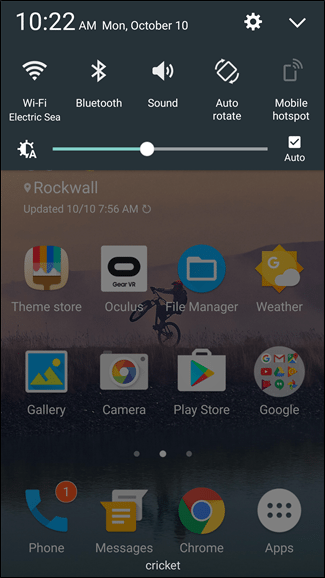
The Status Bar


At the very top, ever-present, is the status bar. it rarely leaves the display, except in some full-screen applications (like video players or games). The status bar displays important information including the time, how much signal you have (both Wi-Fi and cellular), your battery, and notifications such as texts and e-mails. It will largely look the same across various manufacturer skins, save for some stylistic choices.

The Status Bar

Notifications


Notifications have always been one of Android’s strong points. With notifications, the system and apps can notify you when something needs attention, such as an e-mail, text message, or something app-specific such as a Facebook alert. When you get a notification, you’ll see an icon on the left of the status bar at the top of your phone. Pull down on the status bar to see all your notifications, which you can then attend to or clear out.

Notifications

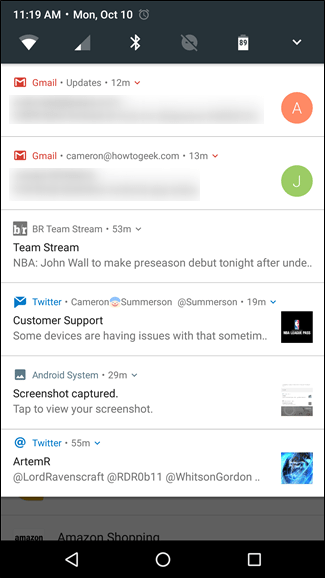
You can tap a notification to open that email, text message, or whatever it is. If you want to clear it, simply swipe it away, or tap the clear notifications icon at the very top to take care of all of them at once.

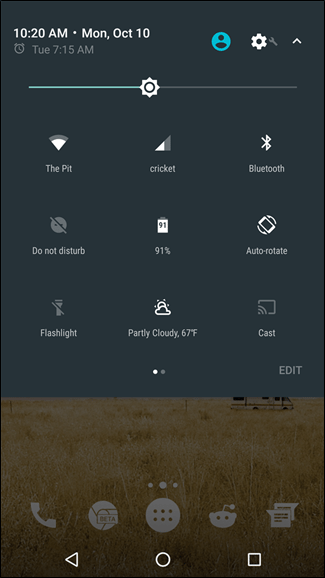
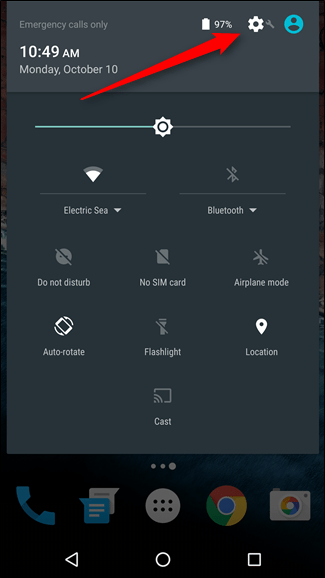
The Quick Settings Panel


In modern versions of Android, you’ll find a “Quick Settings” panel nestled within the notification area. On stock Android devices, you pull the shade down twice to expose the Quick Settings, while other devices–like Samsung and LG–condense it into an always-visible part of the shade. Below we have at look at Stock Android on the left, and Samsung’s Touchwiz on the right.
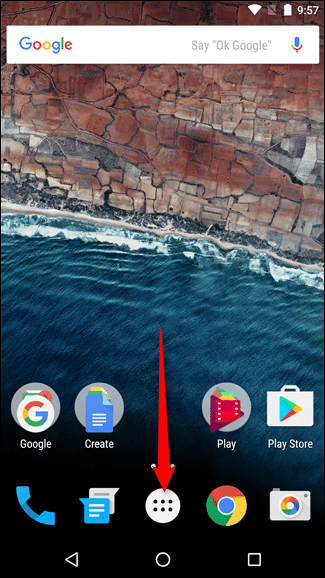
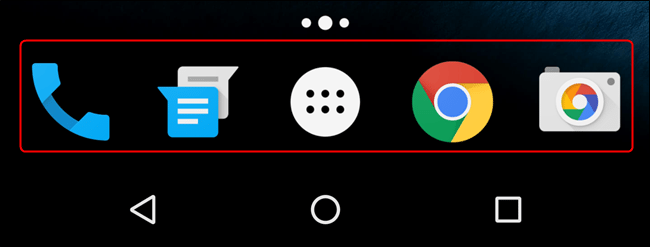

Android Quick Settings PanelAndroid Quick Settings Panel

The Dock


The Dock–sometimes referred to as the “Favorites Tray”–allows you to pin certain apps such as your contacts and phone dialer, so they show up no matter what home screen you’ve swiped to. Further, you can stack apps into folders, or if the whim strikes you, remove them altogether.

Android Dock

We’ll cover how to create app folders in the next lesson.
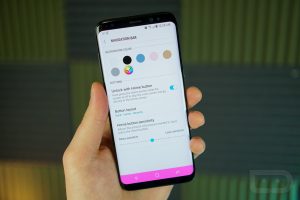
The Navigation Bar


At the bottom of your device is the “Navigation bar,” which–like the status bar–is always visible, except in full screen apps or games . The navigation bar almost always displays three symbols (left to right): back, home, and recent apps. Some manufacturers allow you to customize this layout or switch it altogether.

Android Navigation Bar

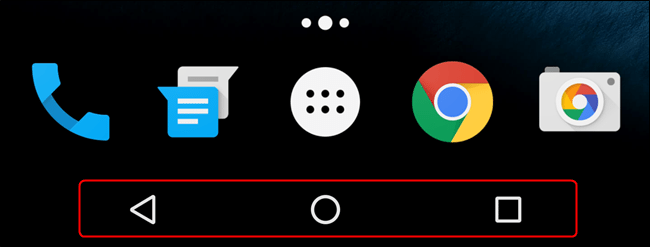
Regardless, you should always see these three navigation elements wherever you are on your device. It’s worth noting that Samsung is one of the last manufacturers that still uses physical capacitive buttons, not on-screen navigation like most Android devices.
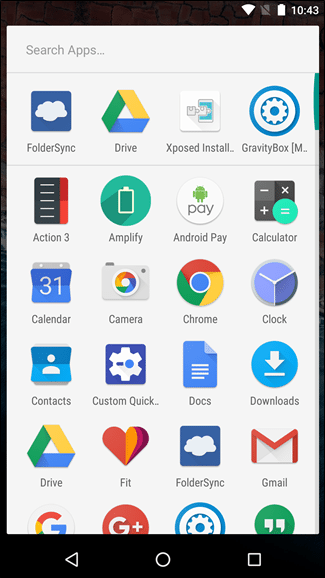
The App Drawer


Finally, there’s the app drawer. This is where all your apps shortcuts hang out, and is accessed by tapping the circular button with six dots in it. It’s generally found in the center of the dock, but some manufacturers move it to the far right side in their respective launchers.


Android App DrawerAndroid App Drawer Open

From here you can open apps, uninstall them, or tap and hold to place shortcuts on the home screen.
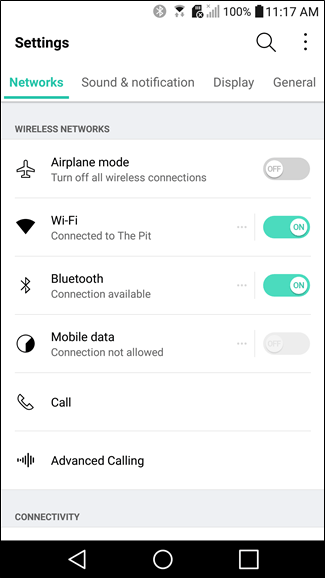
Android’s Settings


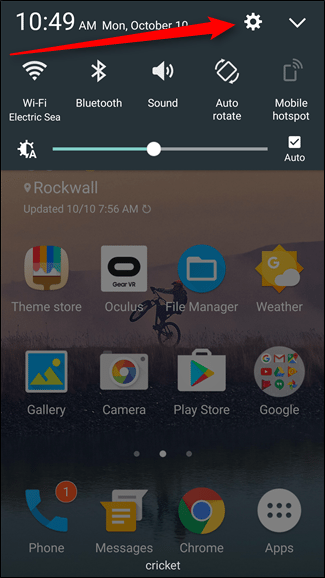
Get to know the settings menu, because this is how you will achieve maximum control over your device. There are two ways to access Android’s settings: you can either open the app tray and tap the “Settings” shortcut (not to be confused with the “Google Settings” shortcut, which is different), or you can pull down the “Quick Settings” panel and choose the cog icon in the upper right corner.


Android SettingsAndroid Settings Gear

While the Quick Settings menu allows you to toggle oft-used settings like Wi-Fi and Bluetooth, you’ll find much more granular controls in the main Settings menu. This is the heart and soul of doing more with your Android device.


Android Wireless NetworksAndroid Wireless Wifi

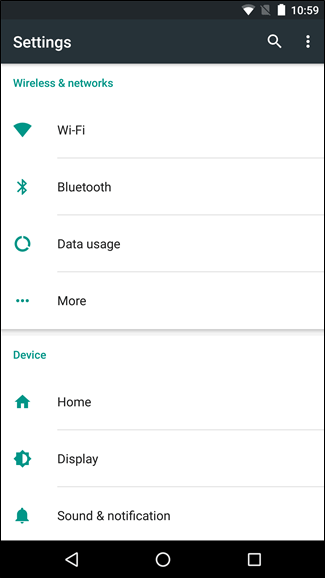
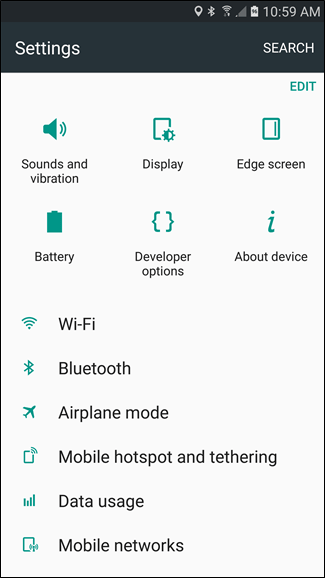
The Settings menu is broken down into several easy-to-follow sections on most devices, with Samsung’s most recent offerings being the exception to the rule–where stock Android (and many others) use subsections to break down this menu, Samsung tosses everything into one long list. It’s also worth mentioning that some manufacturers–LG comes to mind–will break the Settings menu down into tabs. In all honesty, it makes no sense to do this way–good thing there’s a way to fix that.

Android AirPlane Mode

Let’s take a stroll through each of the main options in Android’s Settings menu and talk about what you can do.

Wi-Fi


The Wi-Fi menu is where you’ll connect to and disconnect from Wi-Fi networks. You can also turn your Wi-Fi off entirely to save battery.

Android Wi-fi

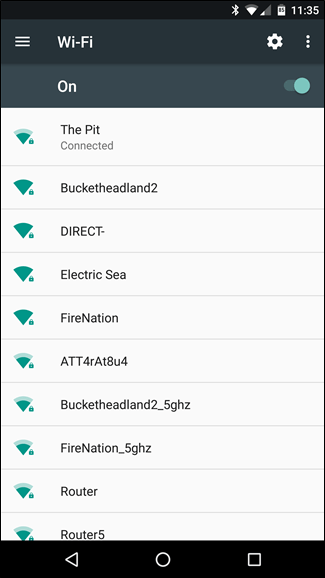
We’ll talk more about this in Lessons 3.
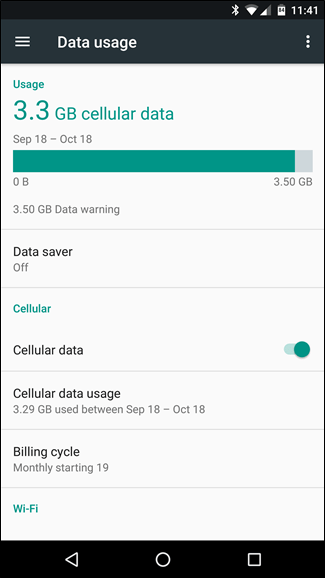
Data Usage


If you’re on a tight data plan and want to know how much data you’re using, or if you want to see how much data certain apps use, then you’ll definitely want to learn this setting and use it. Similarly, you may not want to use your phone’s mobile data when you have perfectly good Wi-Fi at home.

Also Read: How to disable Mobile Data on you Android Phone

Note, you can turn off mobile data, which will help save your battery, but this may have undesirable side effects, such as the inability to send and receive calls or text messages. So we recommend keeping “Cellular Data” turned on.


Android Data UsageAndroid Cellular Data Usage

Display


Using the display accounts for the majority of battery use. Simply put, if you never used your phone except when necessary, your battery would probably last for days (plural). But you don’t use your phone that way, so you can dial down the brightness and decrease the timeout period to eke a bit more time out of your battery. All this happens in the Display section of the settings.

Android Display

Managing Your Apps


In the Settings menu, under the “Apps” section (or “Applications > Application Manager” on Samsung devices), you can find a list of everything that’s installed on your handset. Tapping on an application name will provide a list of useful information: how much storage it uses, how much data it has used since a certain date, any permissions it has been given, notification access, default settings, and how much battery it has used. On Nougat–the most recent version of Android–you can also see how much RAM is being used buy the app, as well as where it was installed from (the Google Play Store or if it was “sideloaded”).


Android Manage AppsAndroid App Info

If you want to uninstall an app, you can also do that here by tapping the big “Uninstall” button. You can also Force Stop an application if it’s misbehaving, though you shouldn’t have to do this very often.
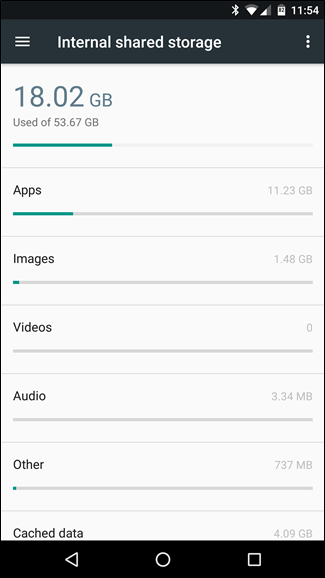
Storage


Your phone has a certain amount of storage for apps, games, photos, videos, music, and other files. If you’re running out of space, the storage settings are an excellent place to determine what is taking up that space, and how much you can reclaim by removing applications and deleting stuff you don’t need. You’d be surprised how much space you get back this way.
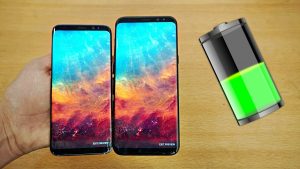
Android Storage

Battery


Battery life, or lack thereof, is a huge impasse to our cord-cutting desires. After all, what fun is a mobile device if you have to be near an outlet “just in case?” What’s the point of thinness and ultra-portability if you have to cart around a clunky charger and cable with you everywhere?

The battery settings give you an overview of how much battery you’ve used, how much longer it’ll last, and which apps are draining the most battery. You can also adjust Andriod’s “Battery Saver” setting here.

Android Battery

Location


Many of your apps, such as “Camera” and “Facebook,” use your location for certain features. This can lead to high battery use, and some people prefer to not give their location away to apps they don’t trust. You can adjust your location settings from this section. Generally, we recommend leaving the main setting on and set to “High Accuracy”, but you can tap any app on this page to revoke its access to your location.
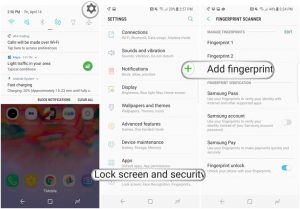
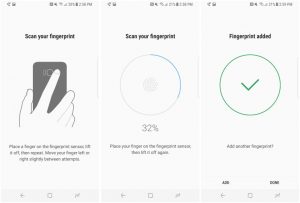
Android Location

Security


There are a great many ways to protect your device and data on Android, and this subsection of where you’ll find the majority of those options. You’ll find the security section on “Lock screen and security” on Samsung devices.


Android SecurityAndroid Lock Screen and Security

Backup and Reset


Backing up your stuff is pretty important on any computer you use, but it’s even more important on your phone. Aside from the everyday disasters that can befall it, it’s also really easy to lose–in the back of taxi cabs, in toilets, or even to common thieves. Using your device’s backup abilities effectively can save you a lot of awful heartache.

Android Backup and Reset

We encourage you to familiarize yourself with your device’s settings before we get to good stuff tomorrow when we’ll talk all about managing your applications and getting to know the Google Play Store’s settings.

To comment on this article and other DIY Vila contents, visit our Facebook page, Pinterest page, Instagram Account or our Twitter feed.