Showing posts with label Remove. Show all posts

Monday, 15 January 2018

How to Remove Black Folder Icon Background in Windows 10

There’s seemingly a bug in Windows 10 that adds a black background to folders. It doesn’t affect the data inside it in any way; it simply makes the folder look, well… ugly. It may happen because of corrupted files, a problem with the folder thumbnail cache or with the Windows image.

I also faced this issue and after messing around with multiple solutions, I managed to fix it for good. If you are dealing with the same problem, then I can help you fix it using the same methods I have tried. Let’s see which solution works for you.

Solution 1: Restore default icon


This solution only temporarily fixed my problem, as it turned black again after restarting. However, many users have reported that this solution fixed the problem permanently for them. And it is easier to execute. Let’s try this first.

Right-click on the affected folder and select Properties from the context menu. In the properties, move to the Customize tab and click on the Change icon button.
change icon
Here randomly select any icon you want and click on OK to select it. Afterward, click on OK again to apply the changes.
select new icon

Now go back to the same Change icon option, and this time click on the Restore Defaults button instead. When you will click on OK, the default icon will be restored and most probably the black background issue will be resolved as well.

restore default icon

Solution 2: Uncheck Read-only attribute


There is a chance that the Read-only attribute of the folder may be causing the folder to show an icon with a black background. Simply remove the Read-only attribute and see if it fixes the problem.

Right-click on the folder and select properties from it. Here uncheck the checkbox next to Read-only in the Attributes section. When you will click on OK, the folder icon may be fixed.
disable read attribute

Solution 3: Delete thumbnail cache


Corrupted thumbnail cache seems to be the most common reason for this problem. Deleting thumbnail cache and resetting it solved this problem for many users, including me. There are many ways to delete thumbnail cache, but I find using the Windows Disk Cleanup tool to be the easiest.

Press Window + R keys and types cleanmgr.exe in the Run dialog. When you will hit OK the Disk Cleanup tool will open up. The system drive (C drive) will already be selected in it, simply click the OK button on it to start scanning.
clean up drive

After scanning, it will show a list of data that can be deleted to save space. Here scroll down and check the checkbox next to Thumbnails, and then click on OK. A prompt will show up, confirm it to delete all the thumbnail cache. Afterward, restart the PC and see if the black background is gone or not.
delete thumbnail cache

Solution 4: Run System File Checker scan


If the problem persists, then it could be due to a corrupted or missing system file. Windows built-in System File Checker (SFC) scan can look for any corrupted or missing system files and automatically recover them (if possible).

To run the SFC scan, right-click on the Start menu icon and select Command Prompt (Admin) from the list.
command prompt
This will open a command prompt window where you need to enter the command sfc /scannow. Once you will press Enter, the scan will start. It can take a few minutes to complete the scan, so hold on tight. Once finished, it will show if there were any corrupt files and whether they were fixed or not.

run sfc scan

Solution 5: Run DISM scan


A problem with Windows images can also make the folder background turn black. You can run DISM (Deployment Image Servicing and Management) scan to see if there is any problem and fix it.

To run the scan, you will have to run a command from an elevated command prompt window. Follow the process mentioned in the solution #4 to open an elevated command prompt window.

In the command prompt enter the command DISM.exe /Online /Cleanup-image /Scanhealth. This will scan for any problems and let you know if it finds any.
dism scan
If the above scan reports any problem, then you can use another command to fix itm. After scanning, enter the command DISM.exe /Online /Cleanup-image /Restorehealth and hit enter. The scan will run and try to fix problems with Windows images and their components.
dism restore health
Both scans can take a bit of time (10-15 min). Once finished, restart your PC and see if the problem is fixed.

Keep Windows updated


The above solution should fix the problem permanently, or at least for the time being. As this problem seems to be a bug, there’s a chance one of the Microsoft updates may resolve this problem for good. As far as I know, there hasn’t been an update that solved this problem (as of writing). Although a future update may fix the problem, so keep your operating system updated.

Ending thoughts


Resetting the thumbnail cache usually solves the black folder icon background problem. Although I will recommend you to try to restore the default icon first as it’s easier to do it and you won’t have to go through thumbnail regeneration process if it solves the problem. And of course, you can run SFC and DISM scan for fixing any corrupted files.

Do let us know in the comments if you managed to solve the black folder icon background in Windows 10, and which method worked for you.

Sunday, 21 May 2017

How to share iCloud Photo Sharing albums with others

Apple"s Shared Photo Streams are part of iCloud Photo Library: They let you post your photos for friends to view, similar to the way you would on other social networking sites like Instagram, but in a more private capacity.


It"s a great feature if you"re sharing images from a trip, you"re away from home at college, or you simply have important work images you want to quickly send to co-workers.


You can share a photo stream with a single person or with a group of people, subscribers can add photos, like and comment on pictures, upload their own images, and so much more!

You can even share a Photo Stream with someone that doesn"t own any Apple gadgets by sharing through a designated web link (pretty nifty, huh?)

All-in-all, iCloud Photo sharing is an unbelievably handy service – if you know how to use it properly! Here"s how you can share and interact with others while sharing your photos with iCloud.

How do I share iCloud Photo albums with other people? It"s simple: here"s how!


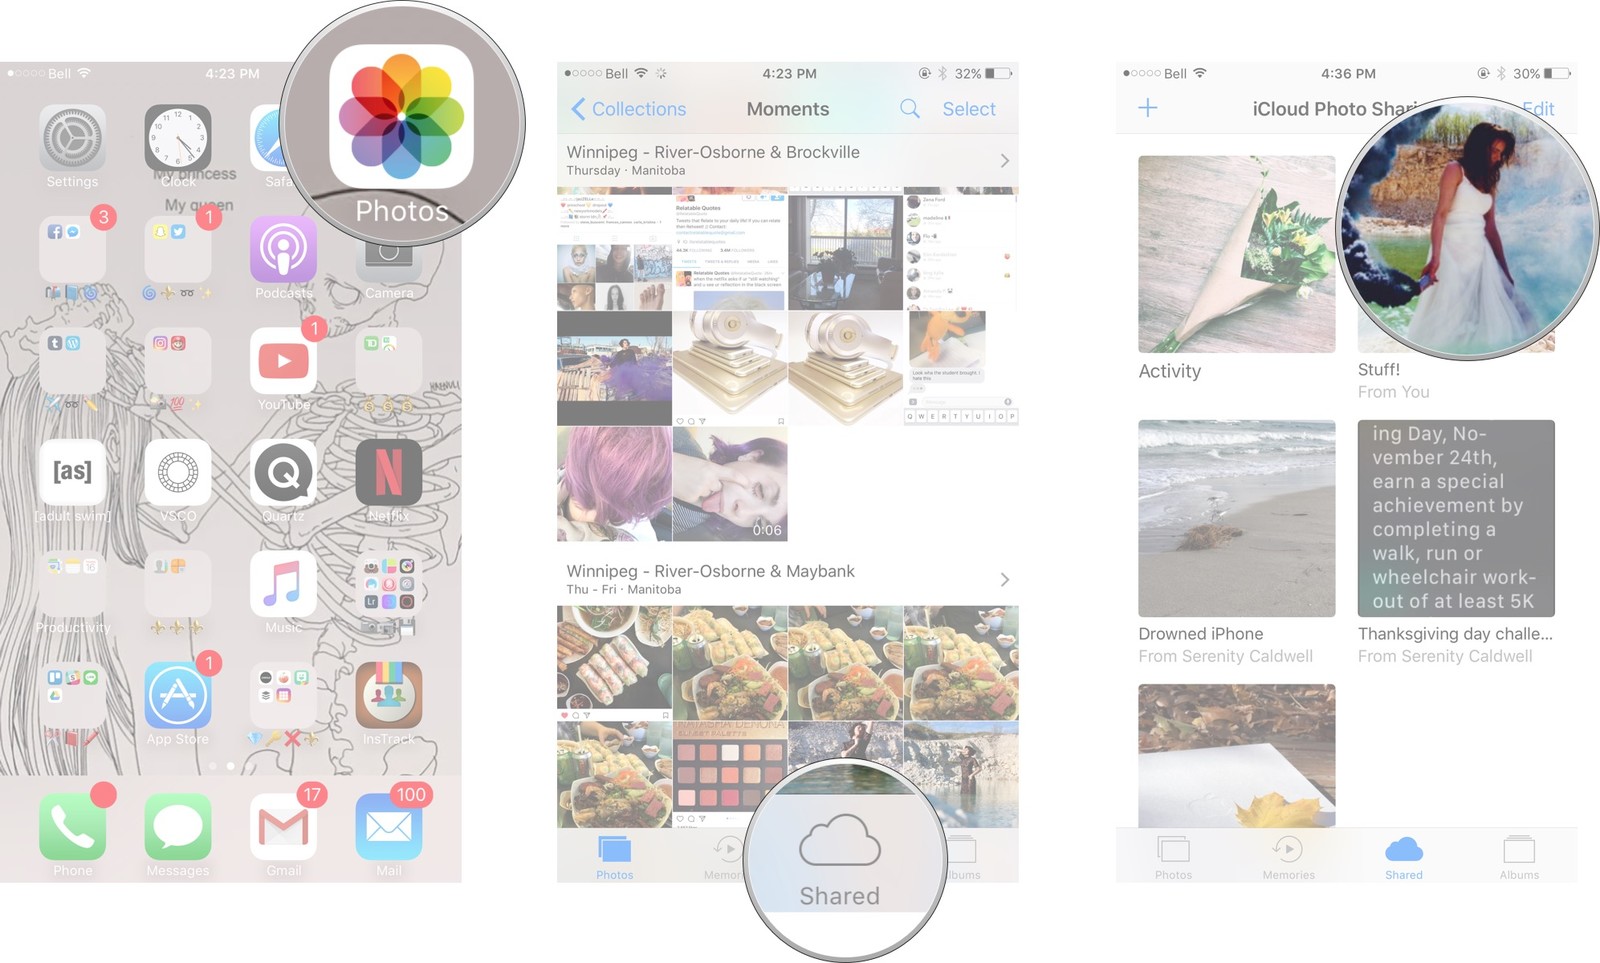
How to add people to a shared photo album on iPhone and iPad


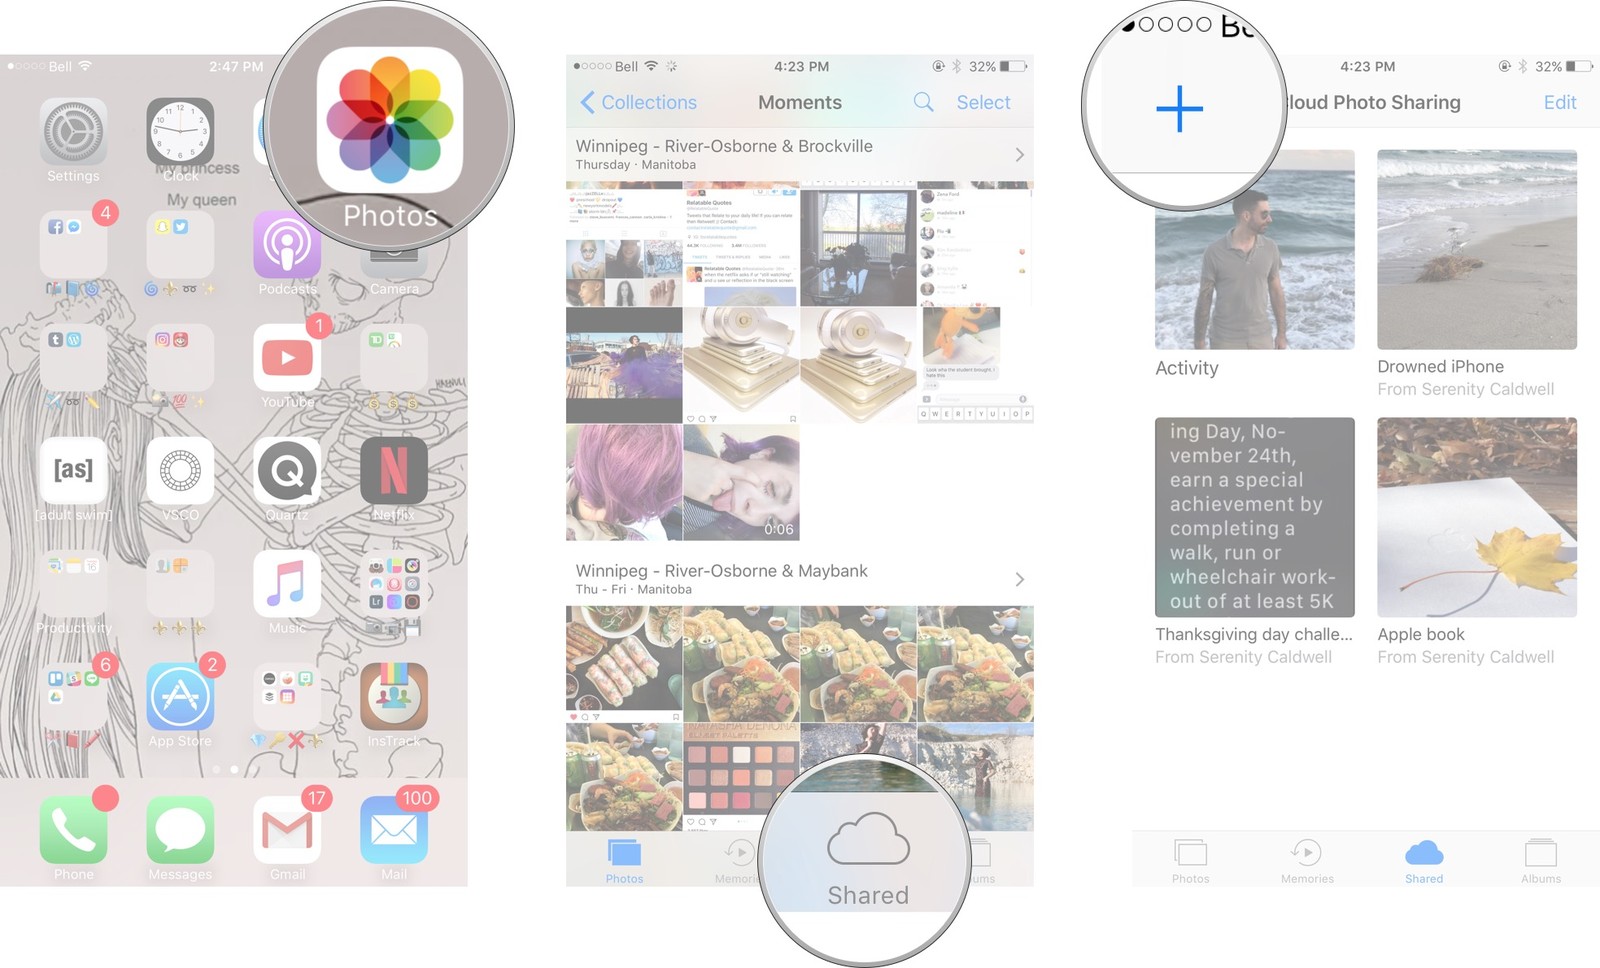
  • Launch the Photos app from your Home screen.

  • Tap Shared at the bottom of your screen.

  • Tap the plus sign in the upper left corner to start a new album.

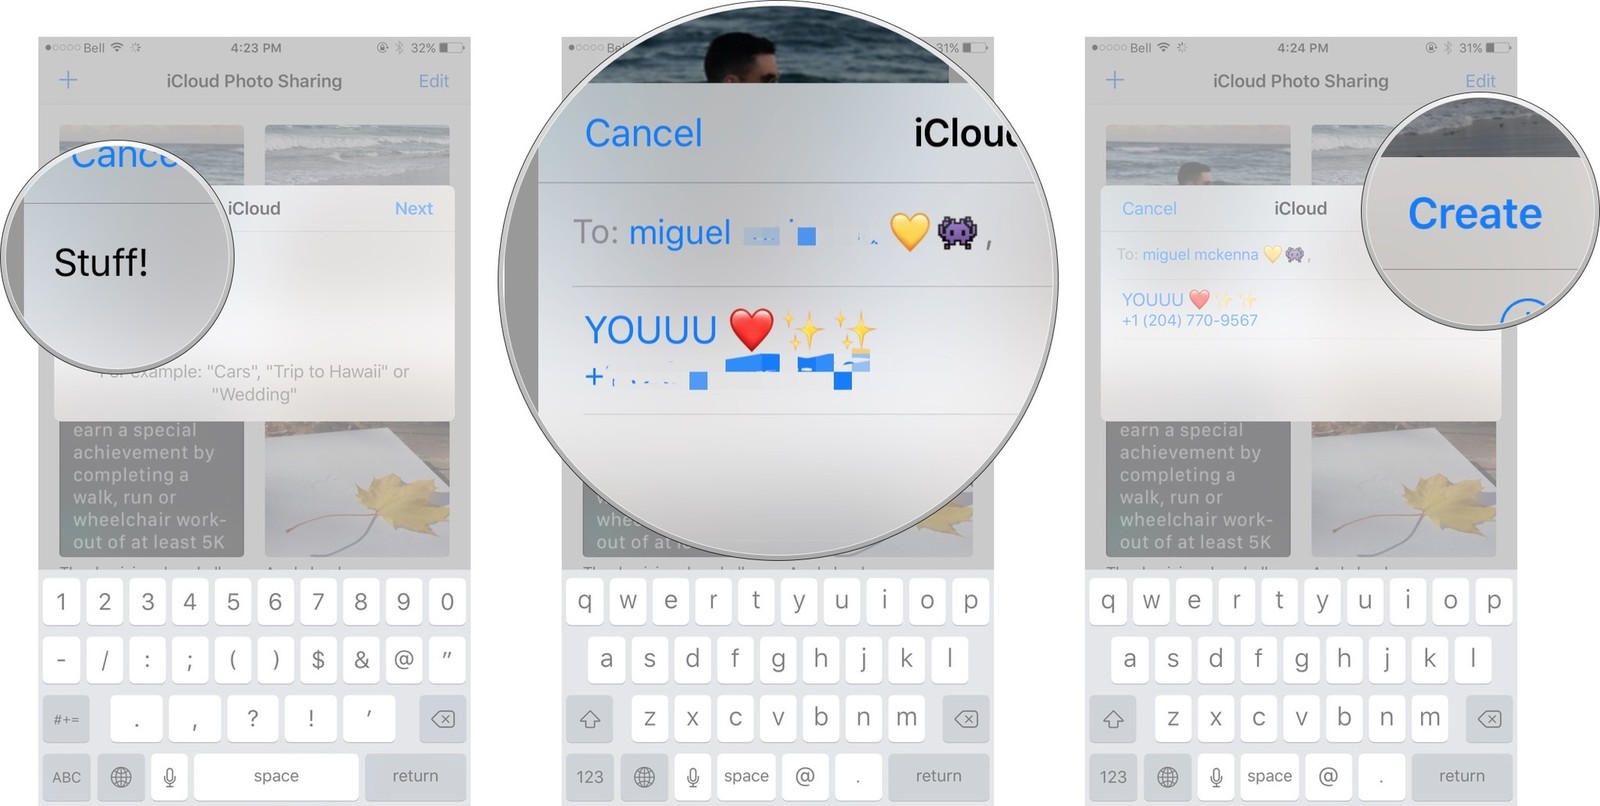
How to add people to a shared photo album
  • Title your album and tap next.

  • Type someone"s name to invite them from your contact list or their email to add them to an album.

  • Tap Create to create the album.

How to create the album

How to remove a subscriber from a shared photo album on iPhone and iPad


  • Launch the Photos app from your Home screen.

  • Tap Shared.

  • Tap the album you would like to remove a subscriber from.

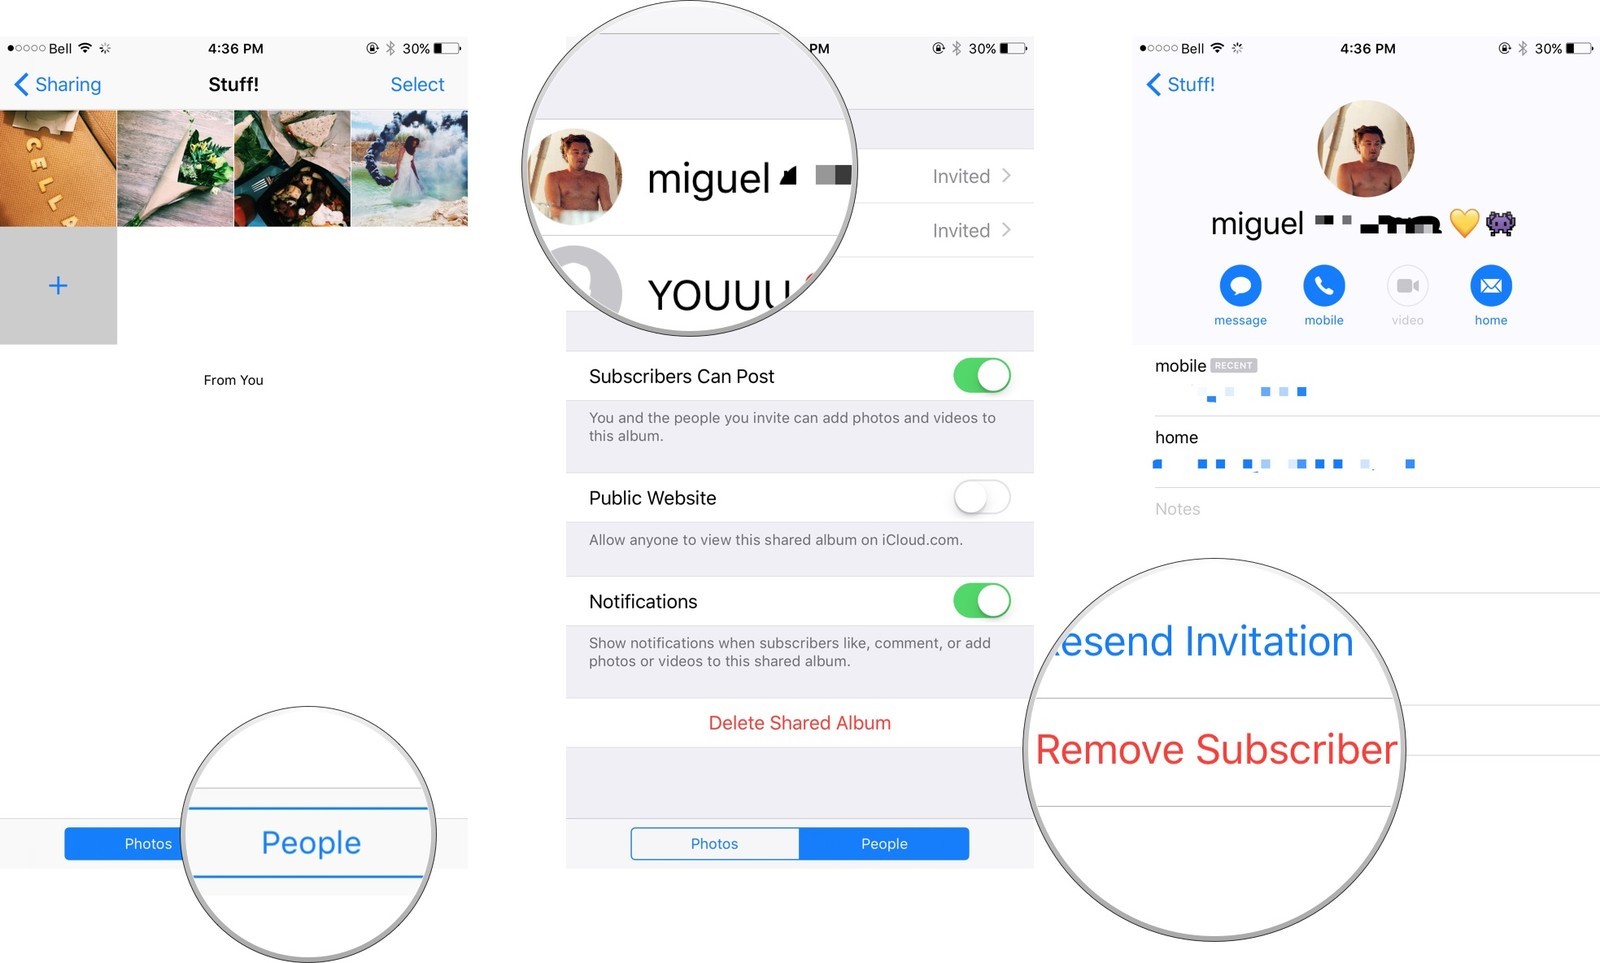
How to remove a subscriber from a shared photo album
  • Tap People.

  • Tap the name of the subscriber you would like to remove from the album.

  • Tap Remove Subscriber.

Remove Subscriber

How to let other add photos to your shared Photo Streams on iPhone or iPad


Thanks to iCloud, you can share Photo Streams with others. It"s not just a one-way experience, either. If you want to share vacation photos with the group you recently took a trip with, everyone can upload to one photo stream together.
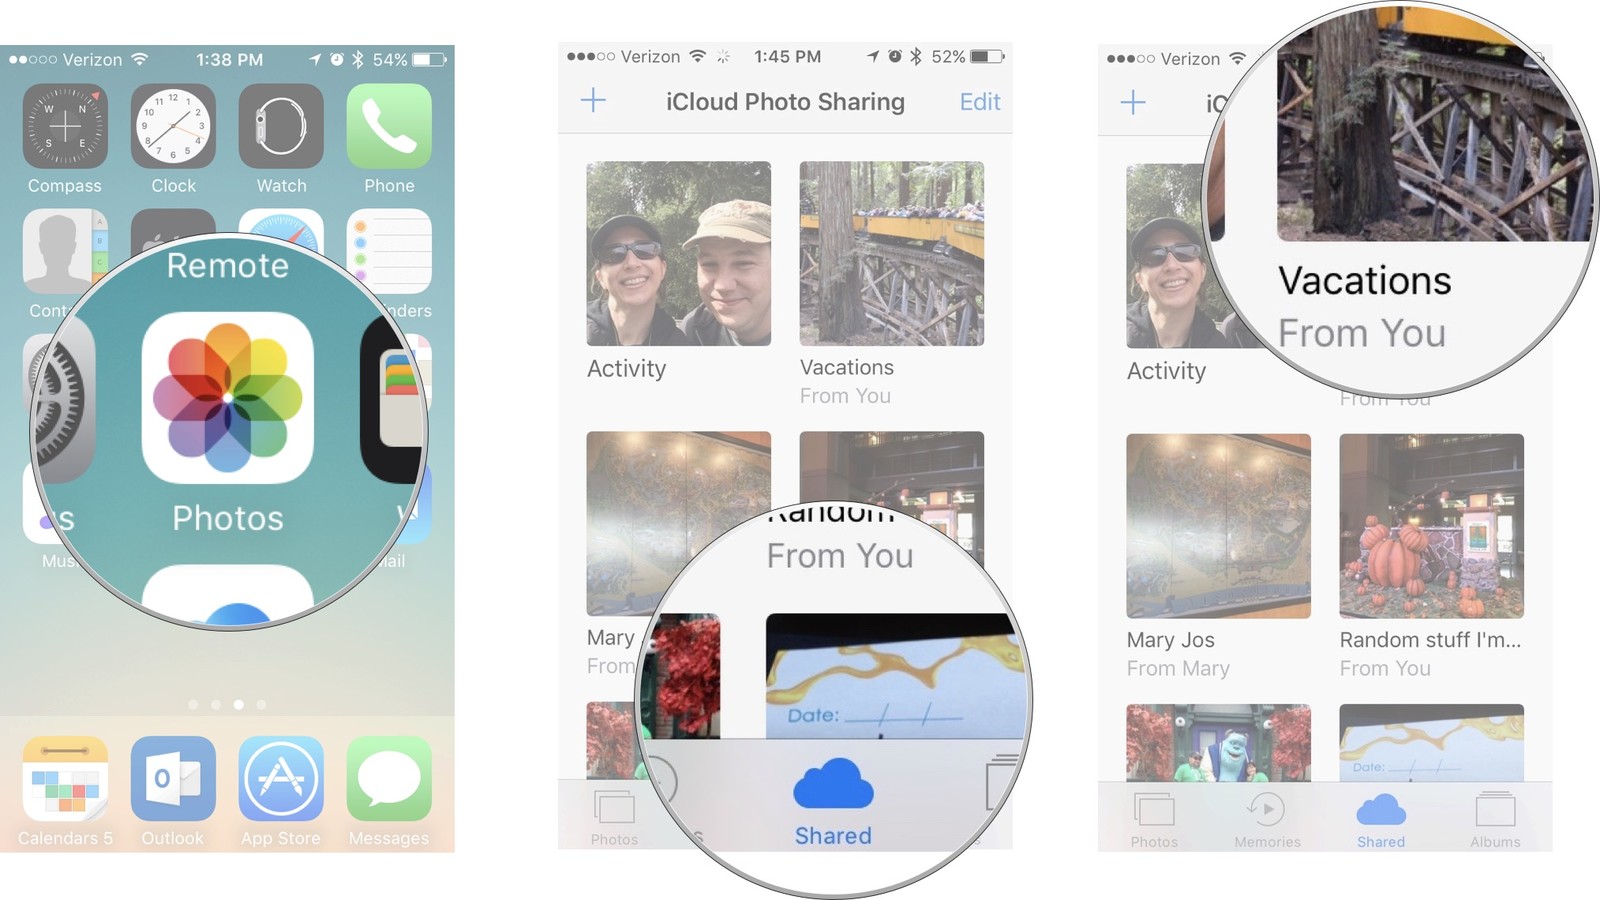
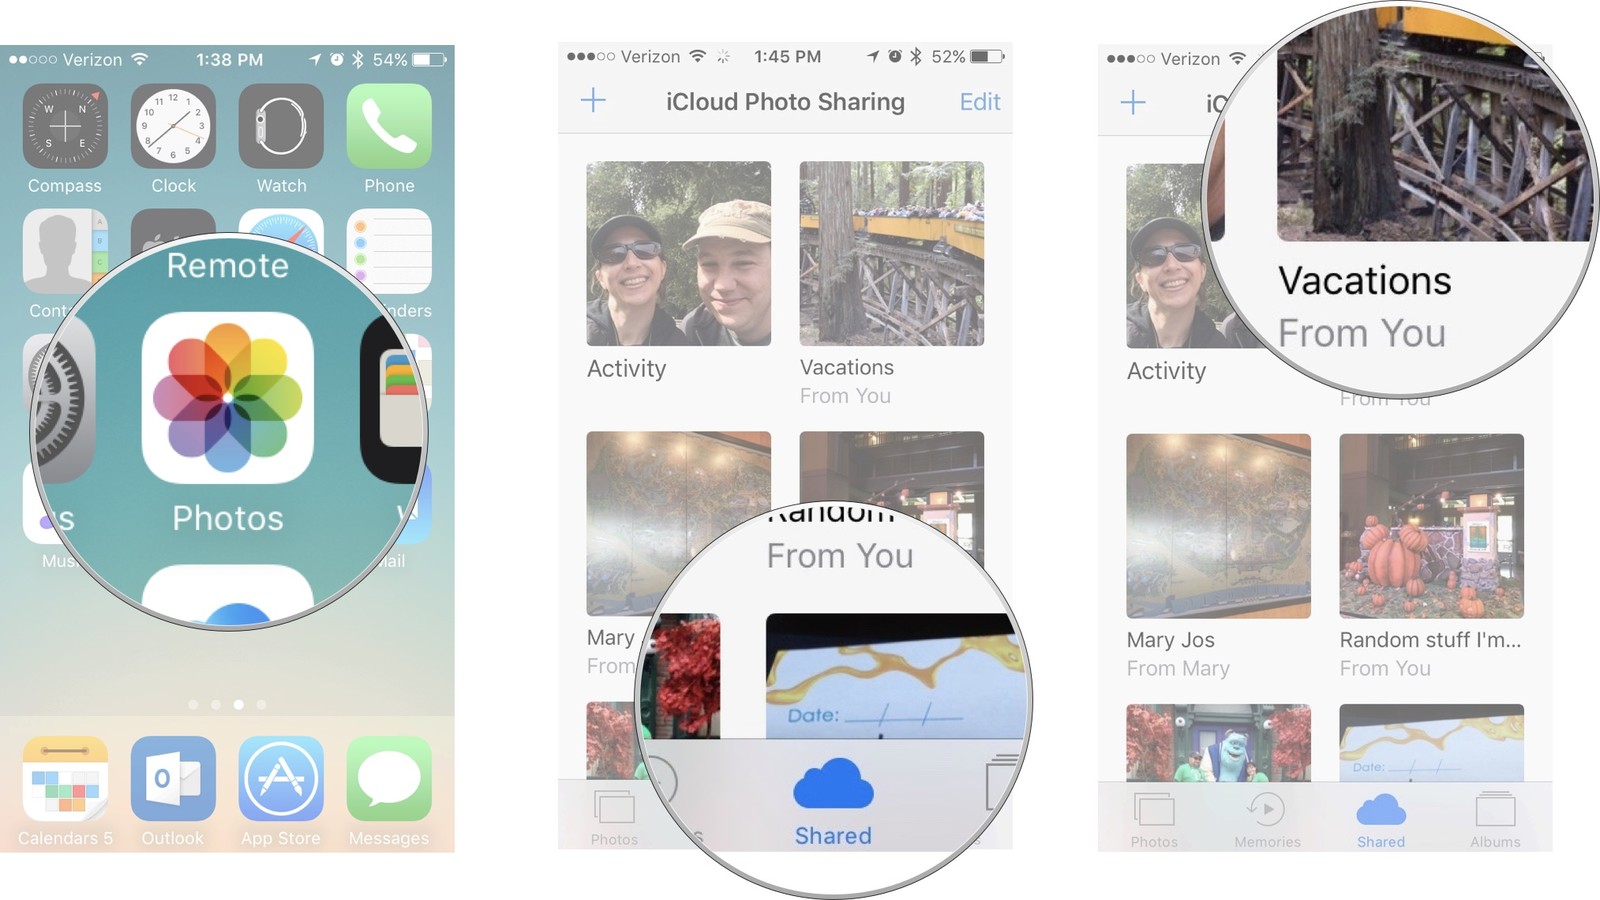
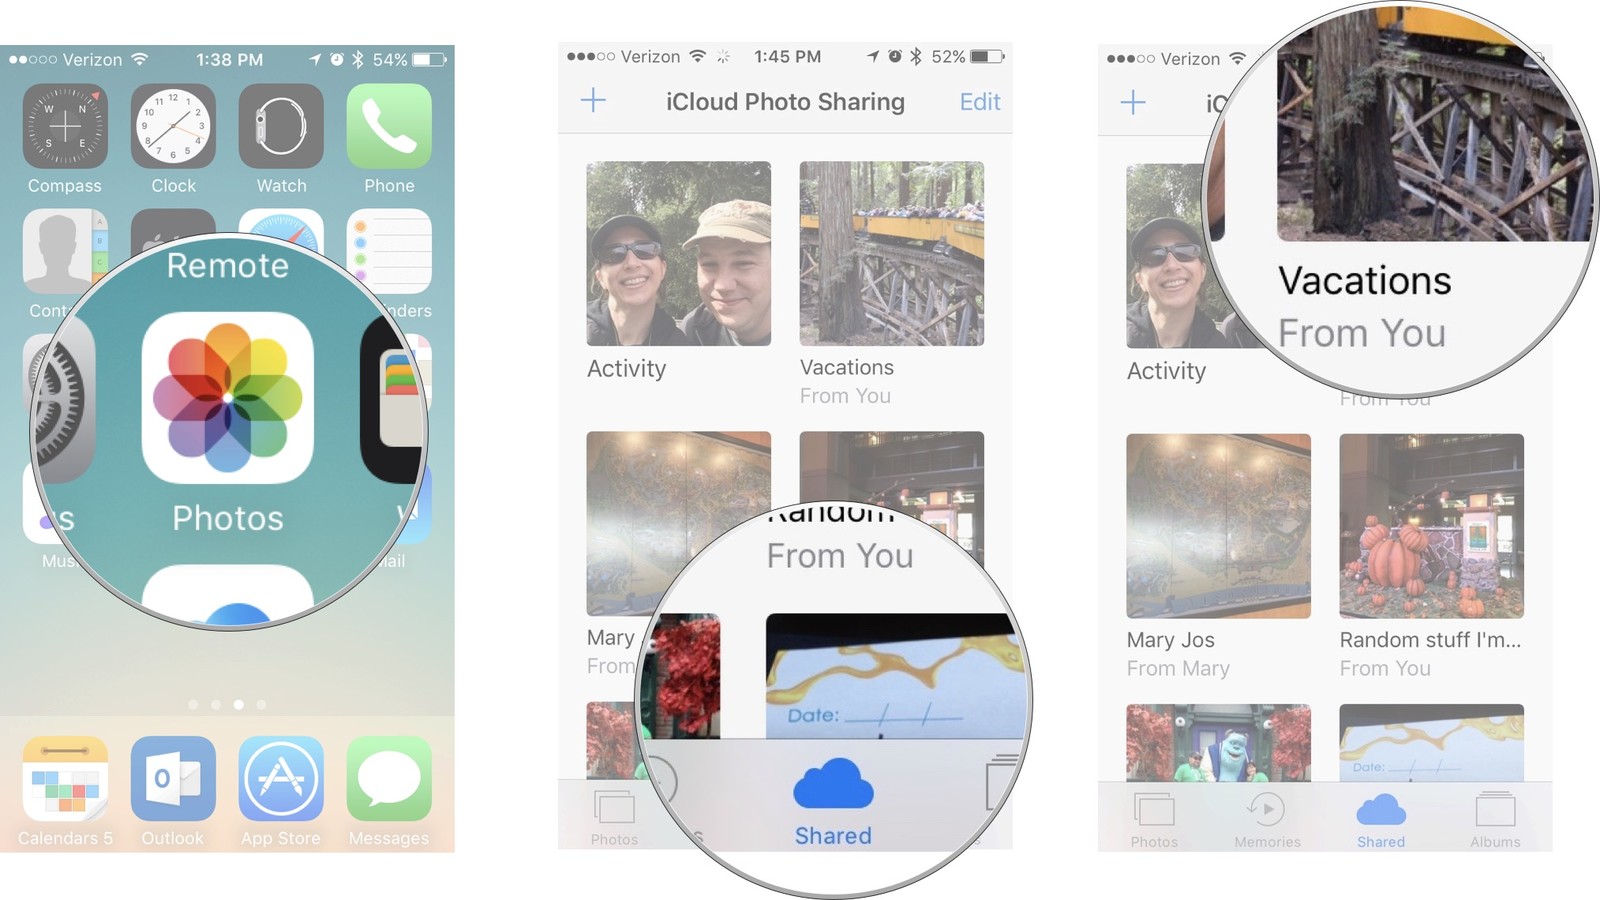
  • Launch the Photos app on your iPhone or iPad.

  • Tap Shared at the bottom of the screen.

  • Tap the album for which you want to allow subscribers to add photos.You might have to navigate out of your shared Activity stream first by tapping Sharing in the upper left corner to go back to your list of shared photo albums.

How to let other add photos to your shared Photo Streams
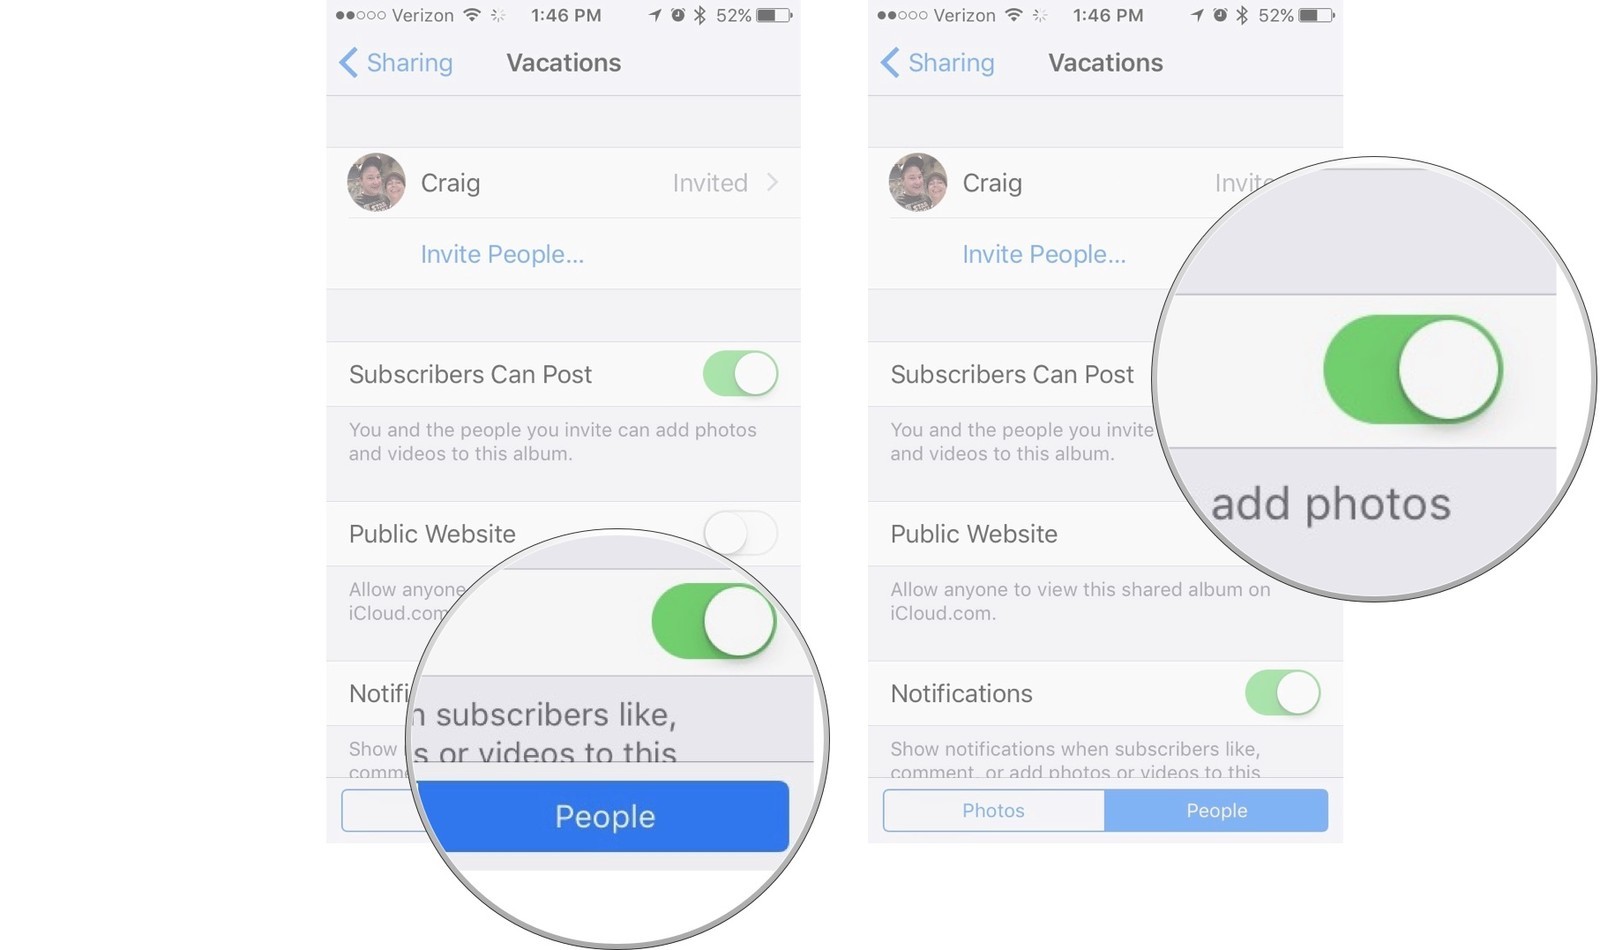
  • Tap People at the bottom right of the screen.

  • Toggle the switch Subscribers can Post on to allow others to add their photos to your shared Photo Stream.

Subscribers can Post

Now everyone that subscribes to your Shared Photo Stream will be able to upload their photos to the same album.


How to like or comment on photos in a shared Photo Stream on iPhone or iPad


Just like posting on social networking sites like Instagram or Facebook, you can like and comment on photos in a shared Photo Stream, the main difference being that only the people you have invited to share photos with will see what you liked and commented on. It"s much more private.
  • Launch the Photos app on your iPhone or iPad.

  • Tap Shared at the bottom of the screen.

  • Tap the album for which you want to like or comment on a photo.You might have to navigate out of your shared Activity stream first by tapping Sharing in the upper left corner to go back to your list of shared photo albums.

How to like or comment on photos
  • Select a photo.

  • Tap Like in the bottom right corner to like the photo.

  • Tap Add a comment in the bottom middle to add a comment.

 Add a comment


How to share a Photo Stream with people that don"t own an Apple gadget


Apple actually makes it possible for non-Apple users to see photos you"ve uploaded to iCloud by viewing them on a public website. All a person needs is the URL. Viewers using iCloud via a web browser will not be able to like or comment on photos, but they can download a copy onto their devices.
  • Launch the Photos app on your iPhone or iPad.

  • Tap Shared at the bottom of the screen.

  • Tap the album for which you want to allow anyone to view photos from a web browser via iCloud.com.You might have to navigate out of your shared Activity stream first by tapping Sharing in the upper left corner to go back to your list of shared photo albums.

How to share a Photo Stream with people
  • Tap People at the bottom right of the screen.

  • Toggle the Public Website switch on to allow anyone with the URL access to the shared album from a web browser.

Toggle the Public Website

These photos don"t have any sort of privacy wall. Anyone with the link can access the photos. Keep that in mind when deciding to share your Photo Streams via a URL link from iCloud. To grab a copy of the link, tap Share Link.


How to unsubscribe from a shared Photo Stream on iPhone or iPad


Things change. People change. Sometimes, you don"t want to see pictures of you and your ex doing awesome things together. Sometimes you just want to unsubscribe to a shared Photo Stream. If you want to remove memories from your iPhone or iPad (and your life), you can unsubscribe from a shared Photo Stream.
  • Launch the Photos app on your iPhone or iPad.

  • Tap Shared at the bottom of the screen.

  • Tap the album for which you want to unsubscribe.You might have to navigate out of your shared Activity stream first by tapping Sharing in the upper left corner to go back to your list of shared photo albums.

How to unsubscribe from a shared Photo Stream
  • Tap People at the bottom right of the screen.

  • Tap Unsubscribe at the bottom of the page.

  • Tap Unsubscribe to confirm that you want to unsubscribe from the shared Photo Stream.

Unsubscribe

This will remove the Photo Stream from your device, including any you uploaded. If you added photos to a shared photo stream that you want to keep, be sure to download them onto your device before you unsubscribe.

To comment on this article and other TechViral contents, visit our Facebook page, Pinterest page, Instagram Account or our Twitter feed.