If you"ve just got a new camera you need to quickly familiarize yourself with a few key settings to ensure that your first batch of shots aren"t a disaster.
And this doesn"t only apply to new cameras. If you"re borrowing someone else"s camera– or if someone else has borrowed yours – you may find that the settings are completely different to the ones you normally use, potentially leading to frustration and disappointment when you see the resulting images.
You can even get caught out by your own camera! If it"s been a few weeks since you last used it, you may have completely forgotten what you last shot, and how you left your camera settings.
So for photographers everywhere, from newbies to pros, here"s a preflight checklist to carry out ahead of any important photo expedition. Some of these might seem obvious – but when you"re in a hurry it"s often the most obvious stuff that you overlook.
1. Charge the battery!
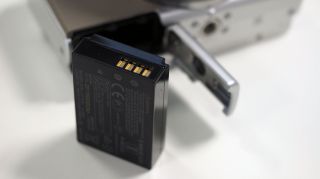
If you"ve just noticed that your camera battery is flat five minutes before you need to leave the house, there"s not a lot you can do except learn for next time. If you"re planning any kind of photo expedition, charge up your battery the night before. Better still, charge your battery back up to full power as soon as you get back from every trip to ensure it"ll be ready for a full day’s use next time.
2. Check/format the memory card
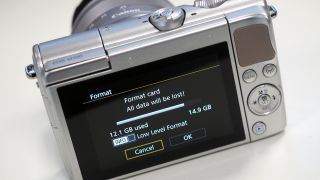
What"s on your camera"s memory card? You don"t know? The longer you leave shots on the memory card in the camera, the harder it is to remember whether you"ve actually transferred them to your computer. It"s better to have a routine: when you get home after taking pictures, transfer them straight away and then delete them from the memory card. Better still, format the memory card too, just in case there are other old photos from other cameras still taking up space.
3. Time zone and date
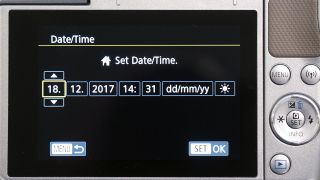
Don’t ignore that annoying prompt you get when you first start up a new camera, or charge up a camera that"s been dormant in a drawer for some time. Can"t be bothered to set the date and time? You should! Otherwise, all your shots will be tagged with the wrong date, they"ll appear in the wrong order when you browse them later on your computer, and you"ll soon forget when they actually were taken, making it much harder in the future to work out what was happening, where you were and who was there.
4. Shooting mode
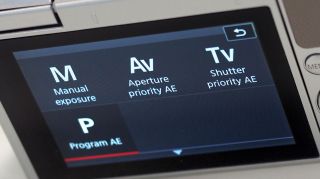
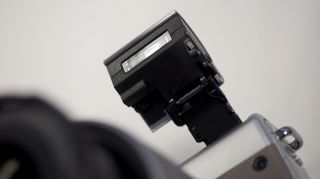
More advanced cameras have a whole range of choices on the main mode dial, including the PASM (Program AE, Aperture-priority, Shutter-priority, Manual) modes, scene modes, effects modes and more. These are usually on the main mode dial, but cameras like the EOS M100, pictured above and which is aimed at novices and smartphone users, has them on a menu screen instead. Make sure the mode is set correctly for what you want to do: Program AE is good if you want the camera to do most of the work but be able to make a few manual adjustments yourself, while scene modes can be handy for specific types of subject, but if you"re completely non-technical just look for the full Auto mode, usually indicated by a green ‘camera’ icon.
5. Flash on/off
Most cameras come with a built-in flash, probably because makers think users expect it, but flash can sometimes do more harm than good. It produces a harsh, short-range light that"s usually worse than the existing ambient lighting. Worse, at a sports stadium flash will do no good at all – and if you"re in a theatre or a museum you"ll be told off or asked to leave. So make sure you know how to turn off your camera"s flash. Some cameras have a "no flash" mode, while others won"t fire the flash unless you pop it up manually. Full Auto mode, however, will generally fire the flash in dark conditions without even asking you – you have been warned!
6. Image size

What"s the point in paying for an expensive, high-quality camera and then only using half its resolution? Make sure your camera"s image size is always set to "L", or "large". There will usually be "M" (medium) or "S" (small) settings too, but you should only use these if you really need to save space on your memory card, and definitely don"t need the camera"s best picture quality – if you choose one of these smaller sizes, there"s no way to make the images you capture full-size later.
7. Image quality
Image size and image quality are often lumped together on the same menu, as with our EOS M100 (see Image Size, above), but they"re two different things. Image size refers to how many pixels the camera captures, but the image quality setting controls the image format used, and the amount of space-saving compression applied. This is where you choose between raw files or JPEGs. With JPEGs, you have a choice of quality (compression) settings. "High" or "Fine" gives the best quality but the biggest files, "Medium" or "Normal" gives decent quality but smaller files, while "Low" or "Basic" means very small files but a visible quality loss. We always recommend "Fine" quality for JPEGs – the files are bigger, but heck, you can just buy a bigger memory card.
8. Focus mode
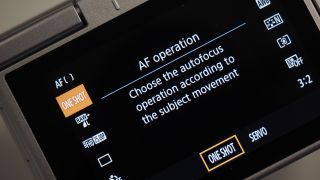
Autofocus becomes a lot simpler if you break it down into two separate settings, so see also Focus zone/point, below. But first you need to make sure the camera is going to focus when you expect it to, and that"s done with the focus mode. This is either single-shot mode (often called AF-S), where the camera focuses once when you half-press the shutter button, or continuous mode (AF-C), where it focuses continuously for as long as the button is held down (on our Canon it’s called Servo AF). Use AF-S mode for single shots, or AF-C mode for continuous shooting in burst mode.
9. Focus zone/point
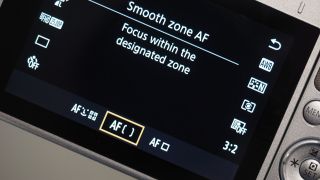
Once you"ve made sure you know when the camera is going to focus, you need to know what it"s going to focus on, which is set with the focus "zone" or "focus point". The simple option is to use the camera"s "area AF mode", which scans the whole scene and picks the subject closest to the camera. If this isn"t what you want, look for the single-point focus mode instead – you can use the focus point in the middle of the frame, or move it around the scene. Some cameras have "zone" or "subject-tracking" modes for focusing within an area of the picture or following moving subjects around the frame – these are best for burst shooting rather than single shots.
10. White balance
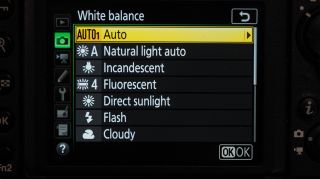
Digital cameras can correct the color balance for different light sources, so that photos taken at dusk or dawn don"t look so "cold" and shots taken under artificial light don"t have such a strong yellow/orange color cast. You can leave the camera set to auto white balance and let it figure out the setting itself, or you can override it by choosing a white balance preset manually. Both are fine, but if you use a preset it"s easy to forget you"ve done so, and later on you may wonder why all your shots have odd-looking colors.
11. Picture style/effect
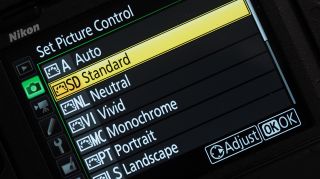
Digital cameras can apply lots of different processing styles to your photos, from "natural", through to "vivid", "black and white" and more. This is a great way to add a little variety and atmosphere to your photos, but it"s easy to forget which style you"ve applied, or to simply fail to check what"s been set before you start shooting. And if you"re shooting JPEG images you can"t alter these styles later; black and white photos stay black and white. If you shoot raw format images, however, you can can choose a different picture style later – in fact, most raw conversion programs will ignore any picture styles set in-camera and just offer their own.
12. ISO
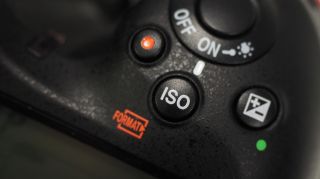
The ISO setting controls your camera"s sensitivity to light. In dark conditions, increasing the ISO lets you carry on shooting without having to use slow shutter speeds and risk camera shake. However, it"s like turning up the volume on a faint analog audio recording – you get lots of background hiss or, in the case of cameras, a lot of digital noise. Most cameras have an auto ISO setting which will only increase the ISO if necessary to prevent camera shake, but there are times when it"s more useful to set the ISO manually. It"s definitely worth checking, because the camera may have a low ISO setting from your last outing that"s not appropriate if you"re shooting in low light, or a high ISO setting that gives you noisy shots when the light is fine.
No comments:
Post a Comment