Backing up your iPad or iPhone is easy to do, and it"s also incredibly important - if we had to give three pieces of advice to iPhone (and iPad) owners, they would be back up, back up, back up. So listen up, as we explain how to back up an iPhone or iPad.
(Of course, once you"ve backed up you"ll need to know How to restore an iPhone from backup, but that"s another story.)
Why you should back up your iPhone and iPad
Our iPhones and iPads are among the most important and valuable possessions we have. Putting aside the financial worth of each device, these little slabs of silicon and glass have become the central repositories for our memories, whether photographs of once-in-a-lifetime events or important documents.
Making sure that all of this precious data is backed up somewhere is a crucial safeguard against theft, damage, or leaving our worlds behind on the back seat of a taxi.
There are also a number of times in a year that Apple issues an update to the iOS software running on your iPad or iPhone - and our advice is to make sure you have a backup of your data before you update, just in case something goes wrong.
Then of course there"s the more joyous occasions of upgrading to a newer model and being able to transfer all of your data quickly and simply by using a backup.
Thankfully there are many ways to back up your information on the web or your PC or Mac, all of which are free and easy to use.
Apple"s iCloud service means your iPhone or iPad can constantly sync important data with web-based servers, and iTunes also offers a simple one-click backup facility. (Wondering which is better? See Should I back up to iTunes or iCloud?) And there are several third-party services that offer a variety of options these days.
As a safety precaution we recommend using at least two of the available solutions, because if the worst happens and your backup is somehow corrupted, you"ll have another version to fall back on.
Back up to iCloud
One of the simplest ways to back up the data on your iPhone or iPad is to use Apple"s own iCloud service.
Each Apple ID has 5GB of storage available, in which you can store bookmarks, contacts, calendars, iCloud documents, mail message, notes, and your iCloud photo library. If you take lots of pictures and videos then you may need to upgrade the storage capacity, as it will fill up pretty quickly. At the moment Apple offers 50GB for 79p per month, 200GB for £2.49 a month, and 2TB for £6.99 a month.
(These prices are a better deal than they used to be, but a lot of people still feel that Apple ought to provide more cloud storage for free. It seems particularly unfair that the free storage allocation is set per Apple ID, rather than increasing as you buy more devices. For related advice, see How to manage iCloud Storage & Backup Settings.)
While iCloud backups are very handy, they"re best used in conjunction with iTunes, to cover all bases. iCloud backups are very easy to set up and once done they will automatically run in the background each time your device is plugged in and on a Wi-Fi connection.
To create and use iCloud backups you"ll need an iCloud account; this is usually created when you first set up your device.
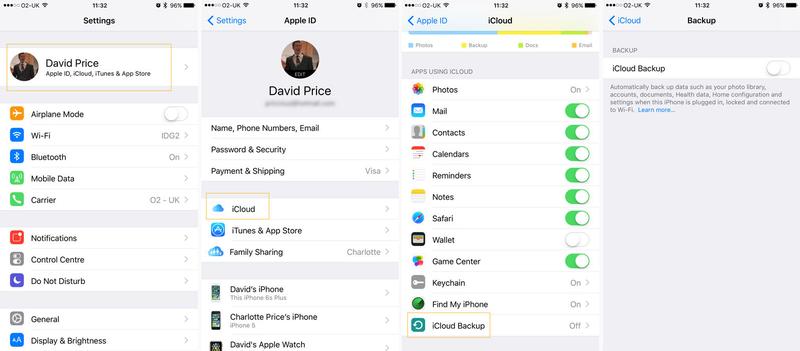
On your Apple device, open the Settings app. You"ll see your name and picture (if you"ve saved one) at the top - tap this. Now select iCloud, and on the next screen scroll down and tap iCloud Backup, the last entry on the long list of "Apps using iCloud".
You"ll now see the option to toggle on iCloud Backup. Once you"ve done so, your phone or tablet will automatically look after your data without any need for you to get involved.
If you want to erase the contents of your iPhone or iPad because you"re selling it, or because it"s not working properly, here"s how to reset an iPhone.

iCloud security worries
Nowhere on the internet is completely safe from hackers, and there is always a chance - whether through tech failures or human error - that the data you store in the cloud will be accessed by criminals. Apple generally has a very good reputation for security, but there have been a couple of high-profile cases involving iCloud that are worth discussing.
Back in 2014 a large number of nude celebrity photos were stolen in a case that juvenile sections of the internet referred to as "the fappening". The photos were obtained from iCloud, it"s believed, by phishing attacks - social engineering scams that persuade victims to give up passwords - rather than a direct attack on the system itself, although it seems that iCloud"s security measures at the time were susceptible to large number of guesses, which made brute-force attacks easier.
We discuss iCloud leaks in a separate article: How to stop photo hacks & leaks on iPhone.
More recently, a group of hackers calling itself the Turkish Crime Family claimed it had access to over 300 million Apple IDs, and threatened to wipe the user data from millions of connected iCloud accounts if Apple didn"t pay a $75,000 ransom in either Bitcoin or Etherum by 7 April 2017.
The group do not appear to have followed through on their threat, fortunately. However, in general we would recommend performing a local backup using iTunes, as the backup data is stored locally and not in iCloud.
Back up to a computer
Having a local backup is always a good idea, as it means you at least know that you have a copy that you control, rather than trusting to the all-powerful cloud. (Public trust in iCloud was damaged by 2014"s celebrity photo leak, although Apple has stated that this was caused by hackers stealing or guessing passwords rather than a failure of Apple"s systems.)
Making a local backup is very easy thanks to iTunes. Years ago you would have regularly plugged your iPhone into your PC to sync music, but with the advent of iTunes Match it"s fallen a little out of favour. iTunes remains a useful piece of software, though, and will give you a complete backup in a matter of minutes.
First off, plug the iPhone into your Mac or PC. In the top lefthand corner, under the play controls, you"ll see a little icon of a phone appear: click this and you"ll be taken to the menu for your device. If you ensure that Summary is selected in the lefthand column, you"ll now have three boxes in the main pane, the middle of which is entitled Backups.
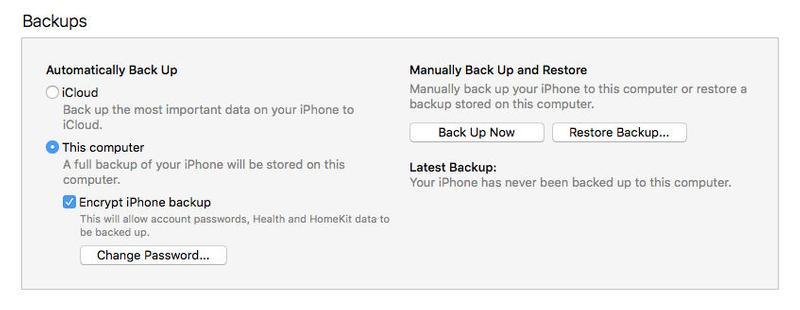
There are two main sections - automatic and manual - and the iPhone is usually set to automatically back up to iCloud. If you prefer that each time you connect your phone to the PC it immediately creates a new, locally stored backup, then click the "This computer" option below.
Moving over to the righthand side of the box, there is the option to create a backup manually. Clicking the "Back Up Now" button will do exactly that, with the length of time it takes dependant on how full your phone"s storage is at that moment. Next to this is the Restore from Backup option, which is where you would head if you wanted to reinstall everything after replacing your iPhone.

You may be asking yourself exactly what is included in the backup. Any photos currently on the device will be stored, as will contacts, calendar accounts, Safari bookmarks, notes, call history, profiles, and several other types of data. Apple has an extensive list of all the things contained in a backup, which you can read here.
The iTunes backup doesn"t make extra copies of any media files, though, so films, music, and apps bought from iTunes will need to be downloaded again from the site or your PC. (The iPhone/iPad will do this automatically when you restore from the backup, however.)
Encrypted backups
There"s one additional type of backup available in iTunes, which is an encrypted one. If you have sensitive data on your phone, or are just safety-minded, then choosing this option will give you an added layer of security by making the backup accessible only through a password that you"ll be prompted to create.
You do an encrypted backup in the same way as an unencrypted one - either automatically or manually, only with the encrypt option ticked. The first time you do this there will be an extra step in which you select a password.
Do remember, though, that this password will not be known to Apple, so if you forget what it is, your backup will become useless. Due to the extra security levels of an encrypted backup, Apple adds additional data which is withheld from the standard version. This includes information from the Health app, alongside your password keychain.
How to back up if you"ve got an Apple Watch
If you"re anything like us - allergic to any more hassle than the bare minimum - you might be thinking that encrypted backups sound like more trouble than they"re worth. (In fact remembering a password isn"t a lot of trouble, although you may find that the first password you try isn"t accepted.) But Apple Watch owners in particular should grit their teeth and pick the encrypted option.
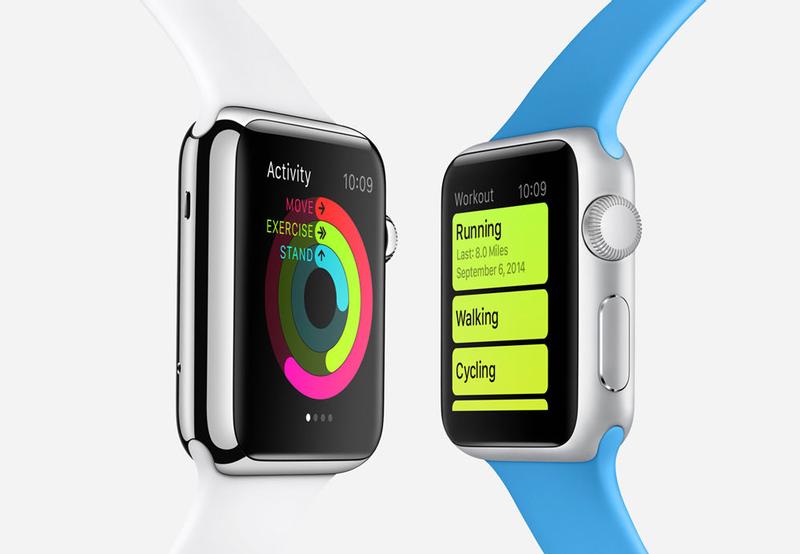
Apple could probably make this clearer (you"ll see in the screenshot above that it mentions only "passwords, Health and HomeKit data"), but the health data that is backed up when you do an encrypted backup, but not when you do a standard backup, includes all your Apple Watch exercise data: your achievements and running times and the rest of it.
The allure of Apple"s motivational trickery is such that losing this data can be extremely distressing, not to mention inconvenient if you"re in the middle of a programme of self-improvement. An encrypted backup is your friend. More on this here: How to back up an Apple Watch.
If you did an unencrypted backup when moving from one iPhone to another, wiped your Apple Watch and then paired it with the new iPhone and discovered all the exercise data is gone, don"t panic.
The exercise data should be stored on the old iPhone (you didn"t wipe it yet, did you?), so if you wipe the new iPhone, do another backup of the old iPhone (encrypted this time), restore the new iPhone from that backup, wipe the Apple Watch and pair it to the new iPhone... after all that, you"ll find that the badges and running times have all come back.
Back up with a third-party service
There"s a sage piece of advice in security circles that states, "If something is only backed up once, it isn"t backed up at all." Creating multiple copies of data is the only way to really guarantee that it won"t get lost in the case of an accident.
Signing up for free accounts with Dropbox, Flicker, Google Drive, OneDrive, or one of the many other options around gives you an easy way to keep your photos and documents safe without too much effort. Pretty much all of them offer automatic syncing, and it won"t interfere with iCloud.
So download one or a few of the apps, follow the instructions, and you"ll have another safety net running in the background. One word of warning, though. Be sure to check the settings for each app, and slide the Use Cellular Data option to off; otherwise you might get a nasty surprise when your next bill arrives.
Google Drive
Google added a new feature to Google Drive for iOS, introducing the ability to back up your contacts, calendar and camera roll in Google Drive, meaning all of that information is kept safely in the cloud should you ever need it. The reason behind Google"s new feature is to encourage iPhone users to switch to Android. Backing up via Google Drive will mean lots of your iPhone"s information will reappear quickly and easily on your new Android phone.
Apple already has an Android app called Move to iOS that does the same thing for those looking to switch from Android to iOS, so it"s not surprising that Google has followed suit.
It"s important to note that Google Drive won"t back up everything, though. It can"t back up texts or your music library, for example.
No comments:
Post a Comment